¶ Workflow Trigger: Shopify Order Fulfilled
In this article, you will learn how to set up the order fulfilled trigger and an example of how it can be used
¶ Navigate through workflow
1. Navigate to Automation on the left > Workflows on the top and create a new workflow or edit an existing one
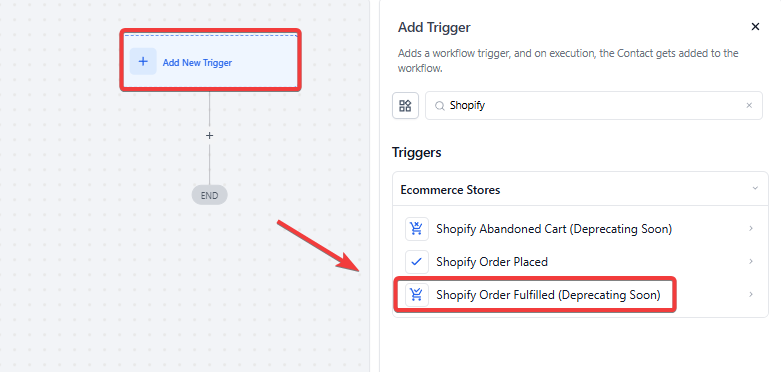
2. Select the “Add New Workflow Trigger ” button
- This will pull up a list of selections of triggers on the right-hand side of the screen

- Scroll down until you see the “Shopify ” section
- Select the “Order Fulfilled ” trigger
- This would be used in the case someone placed an order and you have shipped it to them
- Select the “Order Fulfilled ” trigger
3. Select the blue “Add filters ” option

- Select between Standard Fields or Custom Fields
- Standard: Cart Value - can specify the value of the cart in the “Select Operator” option (choose based on specific needs)

- Custom:
- For Example: Your order has not been shipped! Shipping #*******
4. Click the blue “Save Trigger ” button on the bottom right corner

Example
Scenario: A company wants to send a thank-you email to customers who make a purchase with a cart value exceeding $100.
Configuration:
- Trigger: Order Fulfilled
- Filters:
- Cart Value: Greater than
- Value: $100
- Actions: When the trigger is activated:
- Send an automated thank-you email to the customer.
- Update LeadMagicX to mark the customer as a “VIP Customer.”
- Add a follow-up task to the sales team’s calendar to offer a special discount on the next purchase.
This setup ensures that high-value customers receive personalized follow-ups, strengthening the relationship and encouraging repeat business.
¶ FAQ’s
Question: What does the “Order Fulfilled” trigger do?**
**Answer : The “Order Fulfilled” trigger starts a workflow when an order is marked as fulfilled in Shopify, indicating that the order has been shipped to the customer.
Question: How do I add filters to the trigger?**
**Answer: After selecting the “Order Fulfilled” trigger, click the blue “Add filters” button. Choose between Standard Fields or Custom Fields to narrow down when the trigger should activate.
** Question: What are Standard Fields, and how do I use them?****
**Answer: Standard Fields include predefined options like “Cart Value.” You can set specific criteria, such as a minimum cart value, to activate the trigger based on the order’s total amount.
Question: What are Custom Fields, and how do I use them?**
**Answer : Custom Fields allow you to use data unique to your store. For example, you can create a custom field to include shipping details or other order-specific information.
Question: Can I use this trigger to send a shipping confirmation email?**
**Answer: Yes, you can set up actions in your workflow to send a shipping confirmation email or perform other tasks once the order is fulfilled.
Question: When does the Order Fulfilled trigger fire?
Answer: This trigger fires once an order is marked as fulfilled in Shopify, typically after the product has been shipped to the customer.