¶ Workflow Trigger: Custom Date Reminder
In this article, you will learn how to set up a custom date reminder workflow trigger and an example of what it can be used for.
¶ What is the Custom Date Reminder Workflow Trigger?
The Custom Date Reminder Workflow Trigger is designed to initiate workflows based on a custom date field in your system. This allows businesses to automate actions like sending reminder emails, follow-up tasks, or internal notifications around key customer milestones or deadlines. It gives users the ability to precisely control when a workflow activates — before, after, or exactly on the selected date — providing a high level of automation accuracy.
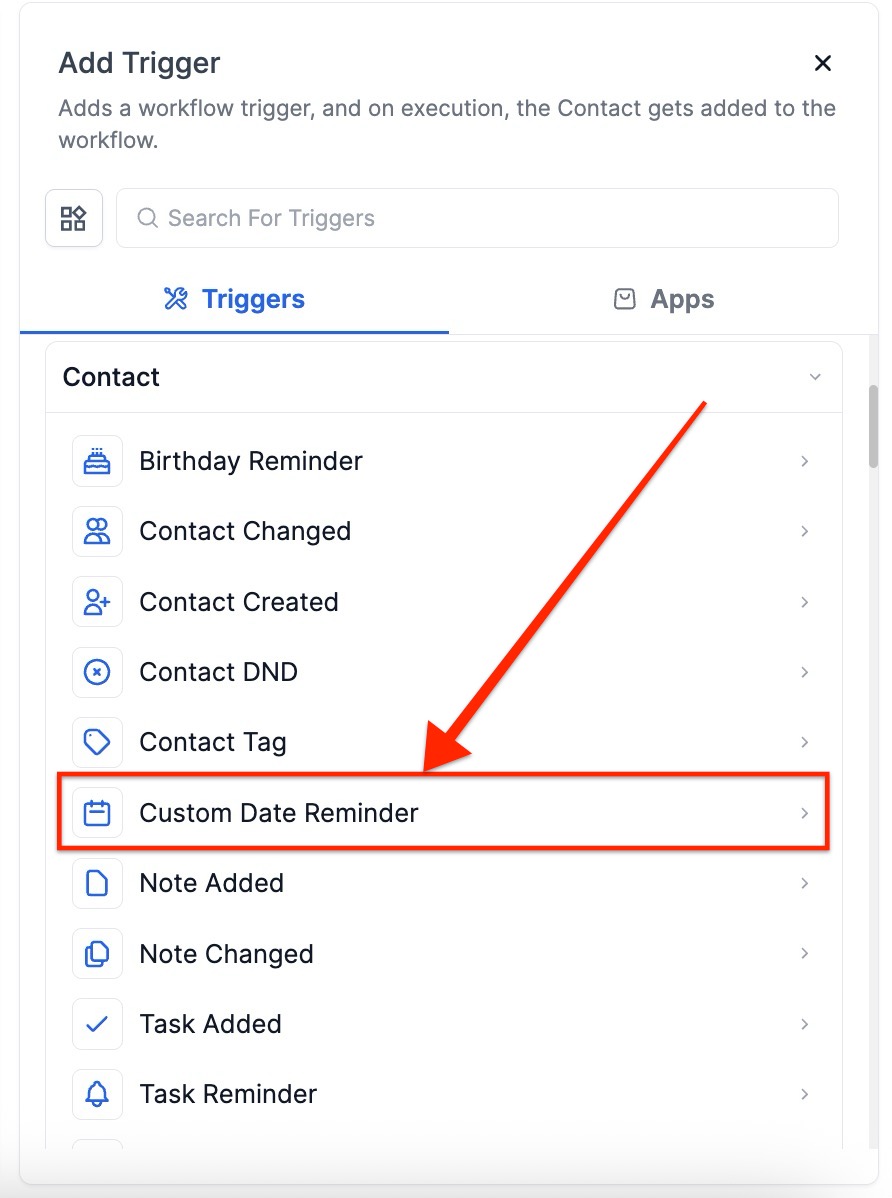
1. Select the “Add New Trigger ” button

- This will pull up a list of selections of triggers on the right-hand side of the screen
2. Scroll down until you see the section called “Contact ”
- Select the “Custom Date Reminder ”
3. Find/Create the custom date field list within their profile
- Please Note: you have to add a filter for the workflow to function
_To create a custom date field: _
1. Click on the “Settings ” icon
2. Scroll down to select “Custom Fields ”
3. You will see a “+ Add Field” button

- A box will appear giving you the option to choose your Custom Field
- Under choosing options, select “Date Picker ”

- Now click the blue “Next ” button

4. Make sure both the Object and Group are selected
- Once done, click the green “Save ” button
5. Next, go back to the Automation section and select the previous workflow trigger
- Please Note: You can change the name of the workflow trigger, this typically helps keep everything organized and easier to understand

6. Click the blue “Add filters ” button

- Now, in the Standard Fields tab, select the new “Custom Date Field ” we just created

- This will now give you the option to select the “Custom Date” filter

¶ 7. Common Custom Date Fields
- Birthday (MM/DD): Great for sending annual greetings where the year isn’t necessary.
- Birthday (MM/DD/YYYY): Useful when age-based logic is required.
- Policy Expiry Date: Automates renewal reminders for subscriptions or policies.
- Policy Purchase Date: Ideal for follow-ups or anniversaries.
- Proposed Appointment Time: Triggers alerts for upcoming meetings or sessions.
¶ 8. Use Advanced Filters for Precision
- After Number of Days: Trigger workflow a set number of days after the selected date.
- Before Number of Days: Activate the workflow before the custom date.
- Has Tag: Only applies the workflow to contacts with a specific tag.
- Day Is: Restrict activation to a specific day of the week.
- Month Is: Set automation to run only during a specific month.

Match on Year Along with Day and Month
Activating this option ensures the trigger will only activate when the year in the custom date field matches the current year. This is especially helpful for workflows tied to specific dates, such as annual reminders or time-sensitive follow-ups, where the exact year is important.

- Click the blue “Save Trigger ” button on the bottom right

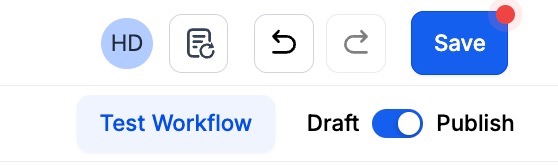
Press Save in the top right corner of your browser to save the workflow
- If your Workflow is ready to be enabled, make sure the toggle switch under Save is set to Publish
- Be sure to test your Workflow to make sure it is set up correctly using the Test Workflow button next to the Publish toggle switch.
- For an in-depth overview of Workflow Testing see our article, “Using the Testing Features in Workflows”
Now your workflow is set up and ready to go with the Custom Date Reminder Workflow Trigger.
¶ FAQs
Question: How can I set up reminders for different dates using this trigger?
Answer: You can create multiple workflows for each custom date field, with each workflow activating its own unique reminder. Be sure to properly name and configure each workflow to maintain organization and avoid confusion.
Question: Is it possible to set reminders both before and after the custom date?**
**Answer: Yes, you can create two distinct triggers—one for reminders before the custom date and another for reminders after the custom date—within the same workflow.
Question: What happens if the custom date field is blank for a contact?
Answer: If the custom date field is empty for a contact, the trigger will not activate for that contact. Make sure that the relevant contacts have dates populated in their custom fields.
Question: Can I use this trigger for recurring annual reminders?
Answer: Yes, by selecting the “Match on the year along with the day and month” option, you can ensure the trigger activates every year on the same date.
Question: How can I make sure the trigger activates only for specific contacts?
Answer: You can apply filters such as “Has Tag” or “Business Niche” to limit the activation of the trigger to specific contact groups.
Question: Why do I need to create a custom date field?
Answer: Creating a custom date field allows you to define specific dates that are relevant to your workflow, such as a subscription end date or an anniversary. This field is used by the trigger to determine when the workflow should be activated.
Question: How do I create a custom date field?
Answer: Go to the “Settings” icon, scroll to “Custom Fields” in the Other Settings area, and click the “+ Add Field” button. Choose “Date Picker” as the field type, ensure both the Object and Group are selected, and click “Save.”
Question: Can I test the workflow before activating it?
Answer: Yes. Use the Test Workflow button to simulate the workflow and verify that the trigger and associated actions work correctly before publishing.
Question: What does the “Match on Year Along with Day and Month” setting do?
Answer: This setting ensures that the trigger only activates when the specific year in the custom date field matches the current year. It is particularly useful for time-sensitive follow-ups where the exact year is a critical factor for the automation.
Question: Can I set the exact time of day for the reminder to be sent?
Answer: The trigger itself activates as soon as the date matches your criteria (usually at the start of the day). To control the exact time your customer receives a message, add a Wait step immediately after the trigger and select the “Time Window” option to define your preferred hours.