¶ Workflow Action: Wait
Workflow Action: Wait
Using the Wait action in the Workflow Builder allows you to hold Contacts before advancing to the next Workflow step. This can be useful for many reasons, from appointment bookings/reminders to follow-ups. Now, let’s look at how to set up a Wait event.
¶ Step 1: Adding an Action to the Workflow
- Navigate to Automation > Workflows. Create a new workflow or edit an existing one.
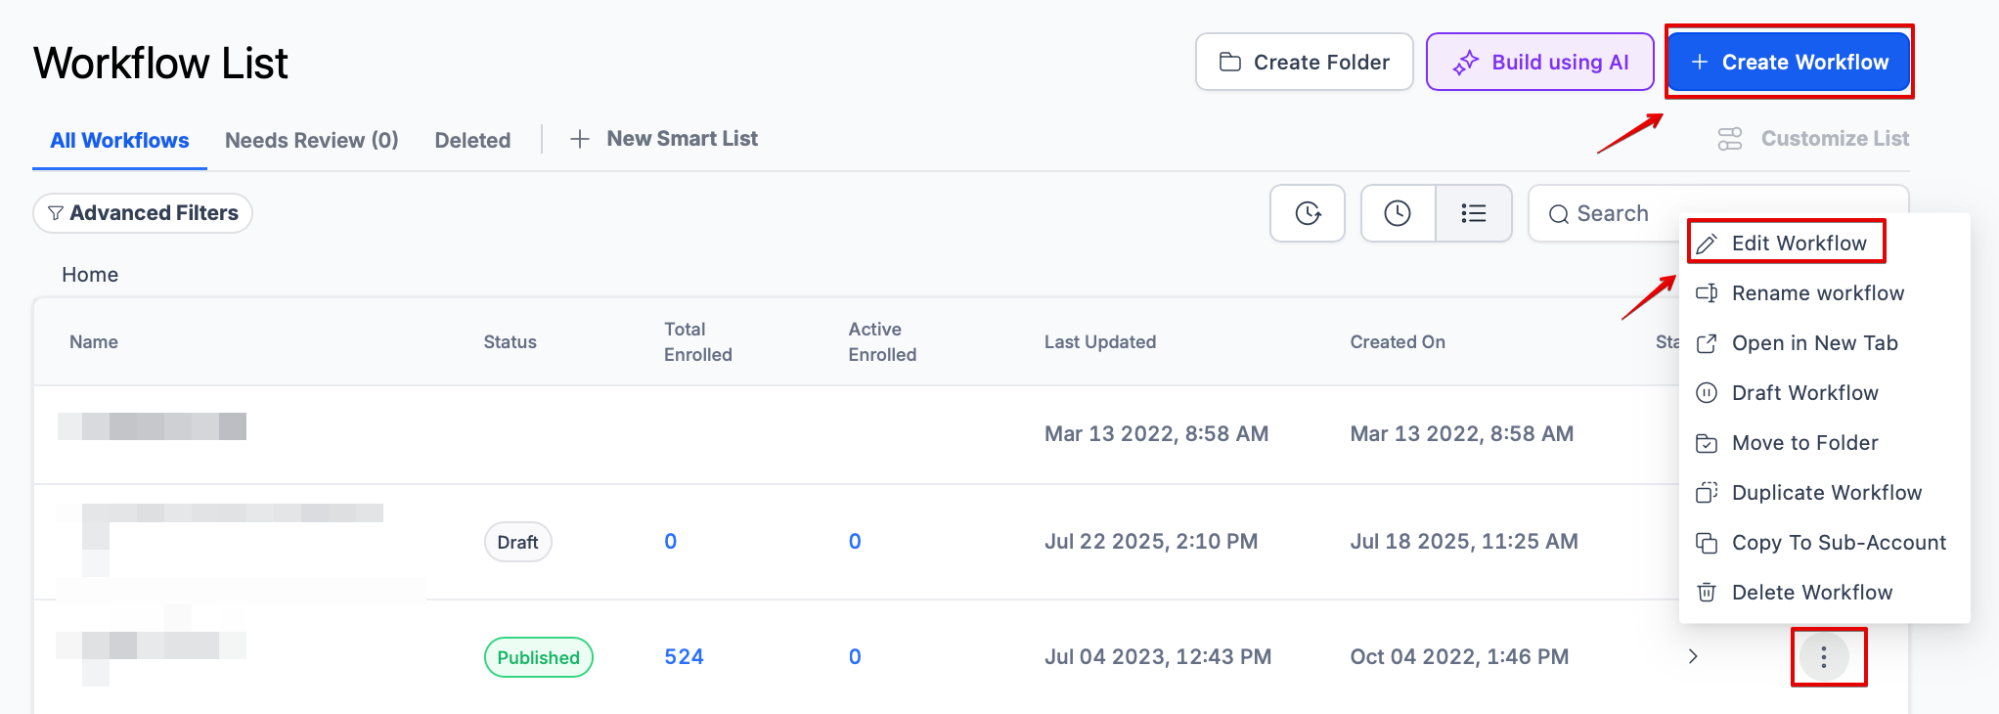
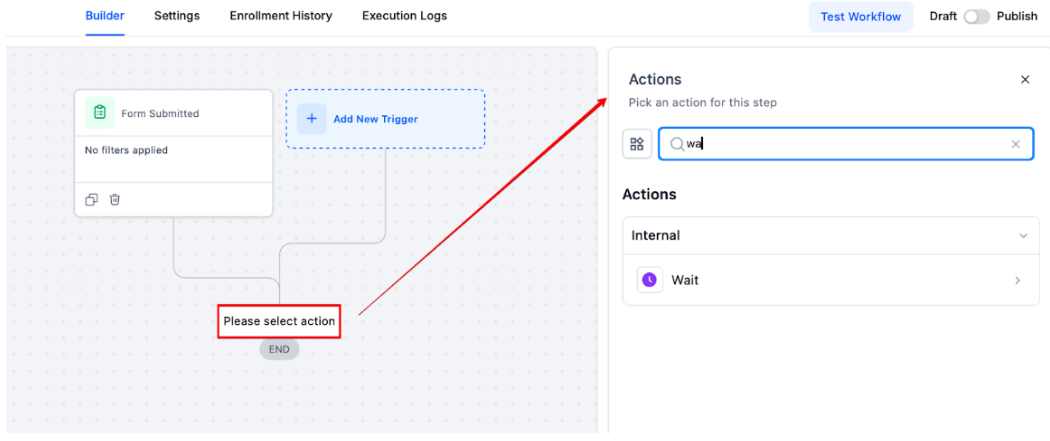
- Click into the Workflow and click the + icon to add an action
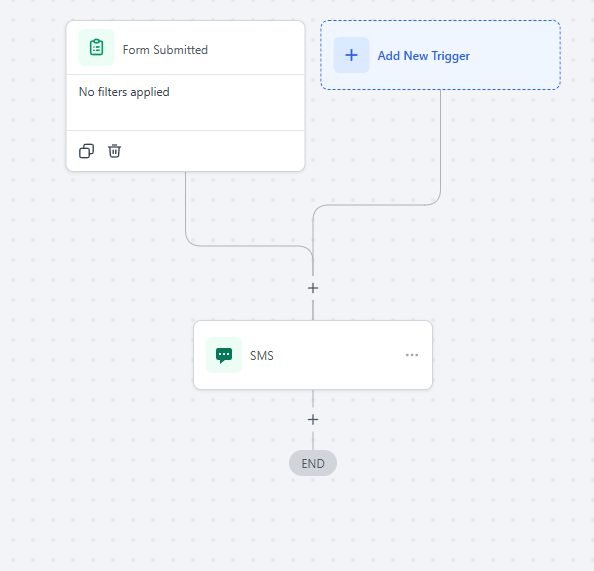
- Choose the Wait action from the list.
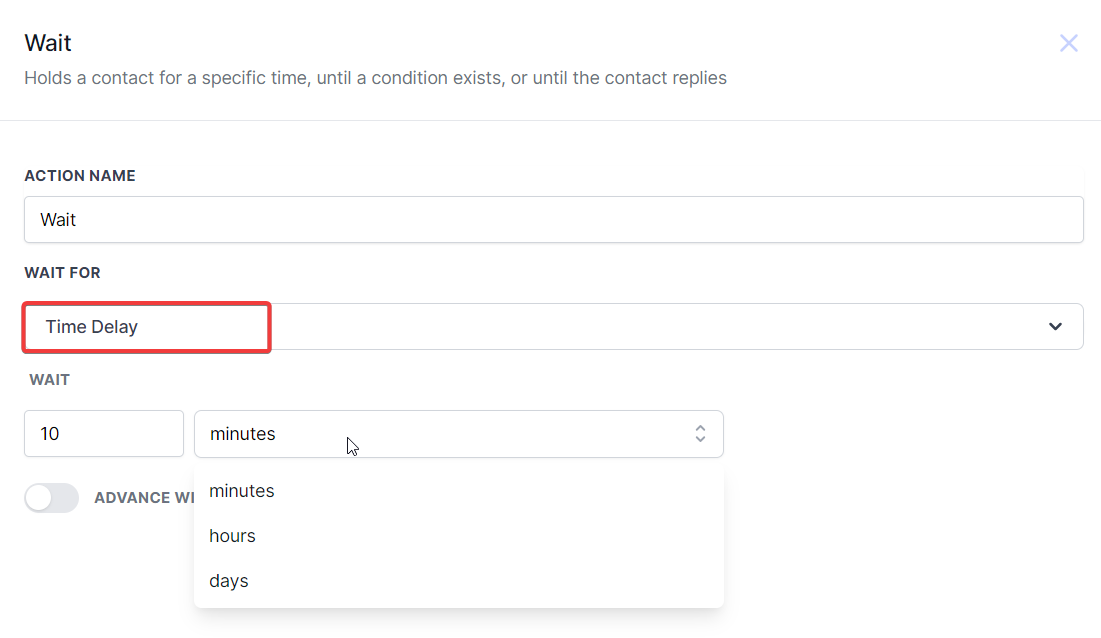
¶ Step 2: Under “Wait For” choose the type of Wait action you wish to use
There are several options for customizing the Wait action, categorized as Time-based or LeadMagicX events. Here’s a brief description of each type of Wait action you can set up:
¶ Time-based:
-
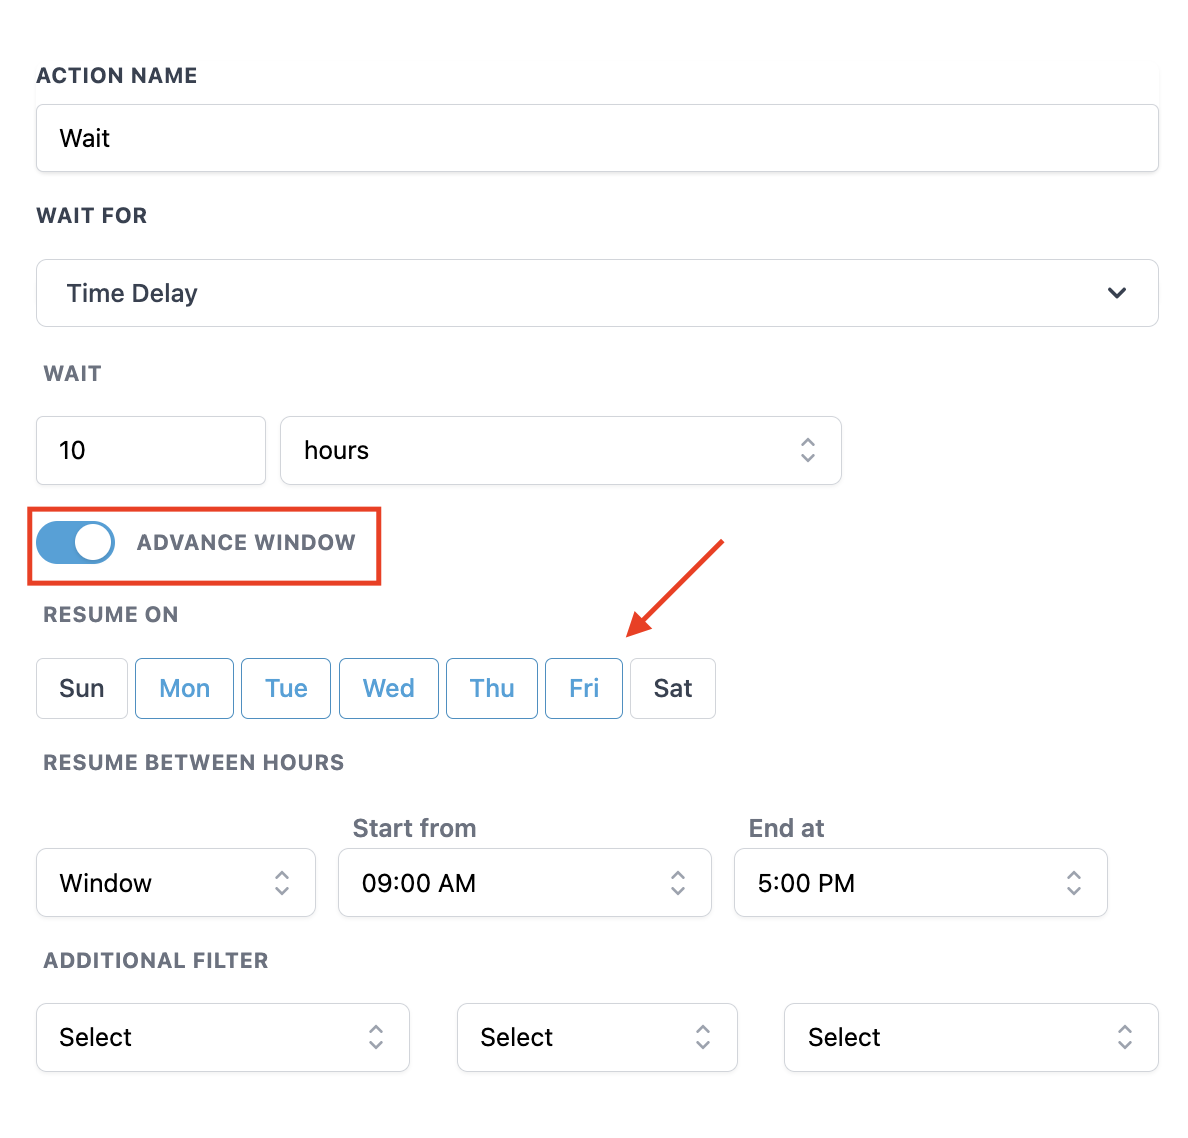
Time delay: waits for a set amount of time.
-
-
NOTE: You can toggle on the “Advance Window,” which will specify the time frame the wait period actually counts (i.e., Monday through Friday, 9 am-5 pm). If you have a time delay set for 10 minutes and someone enters the step on a Saturday, but you have a window set for Monday through Friday, 9am-5pm, the time will start at 9am on Monday.
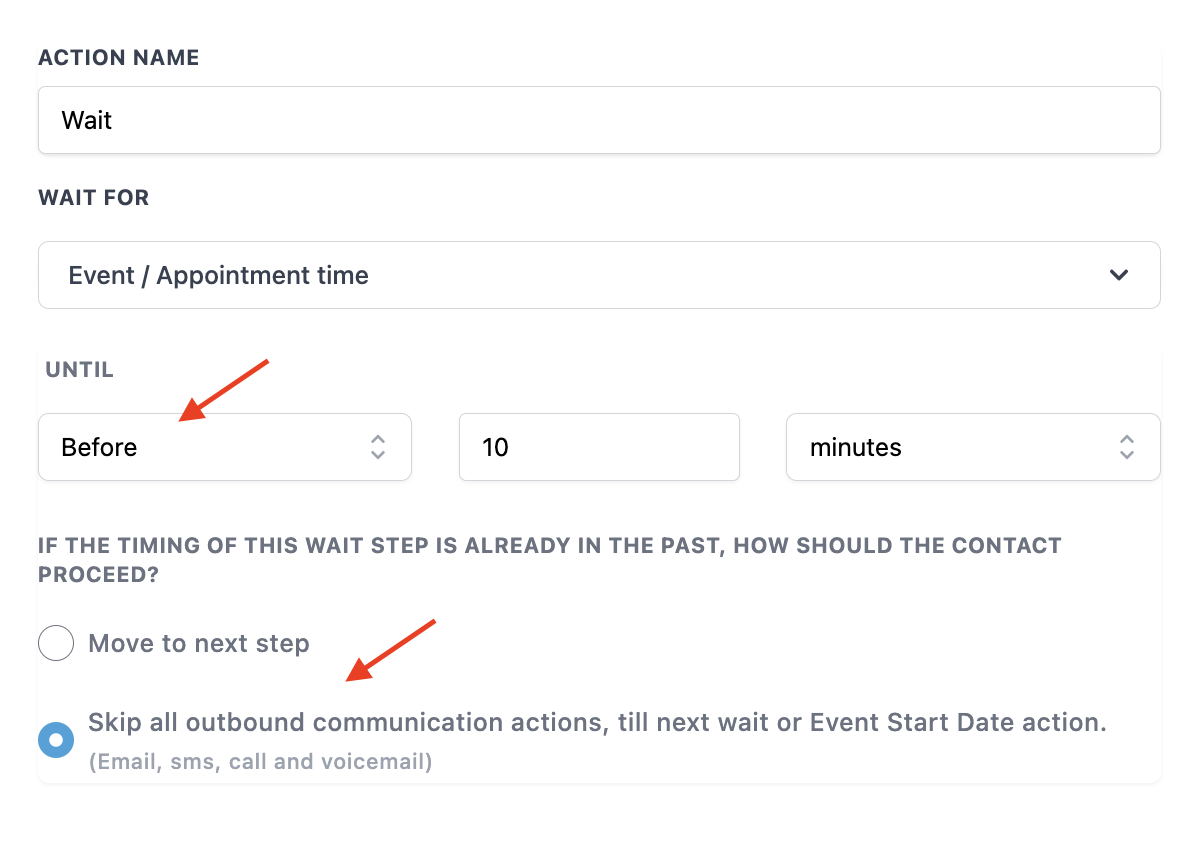
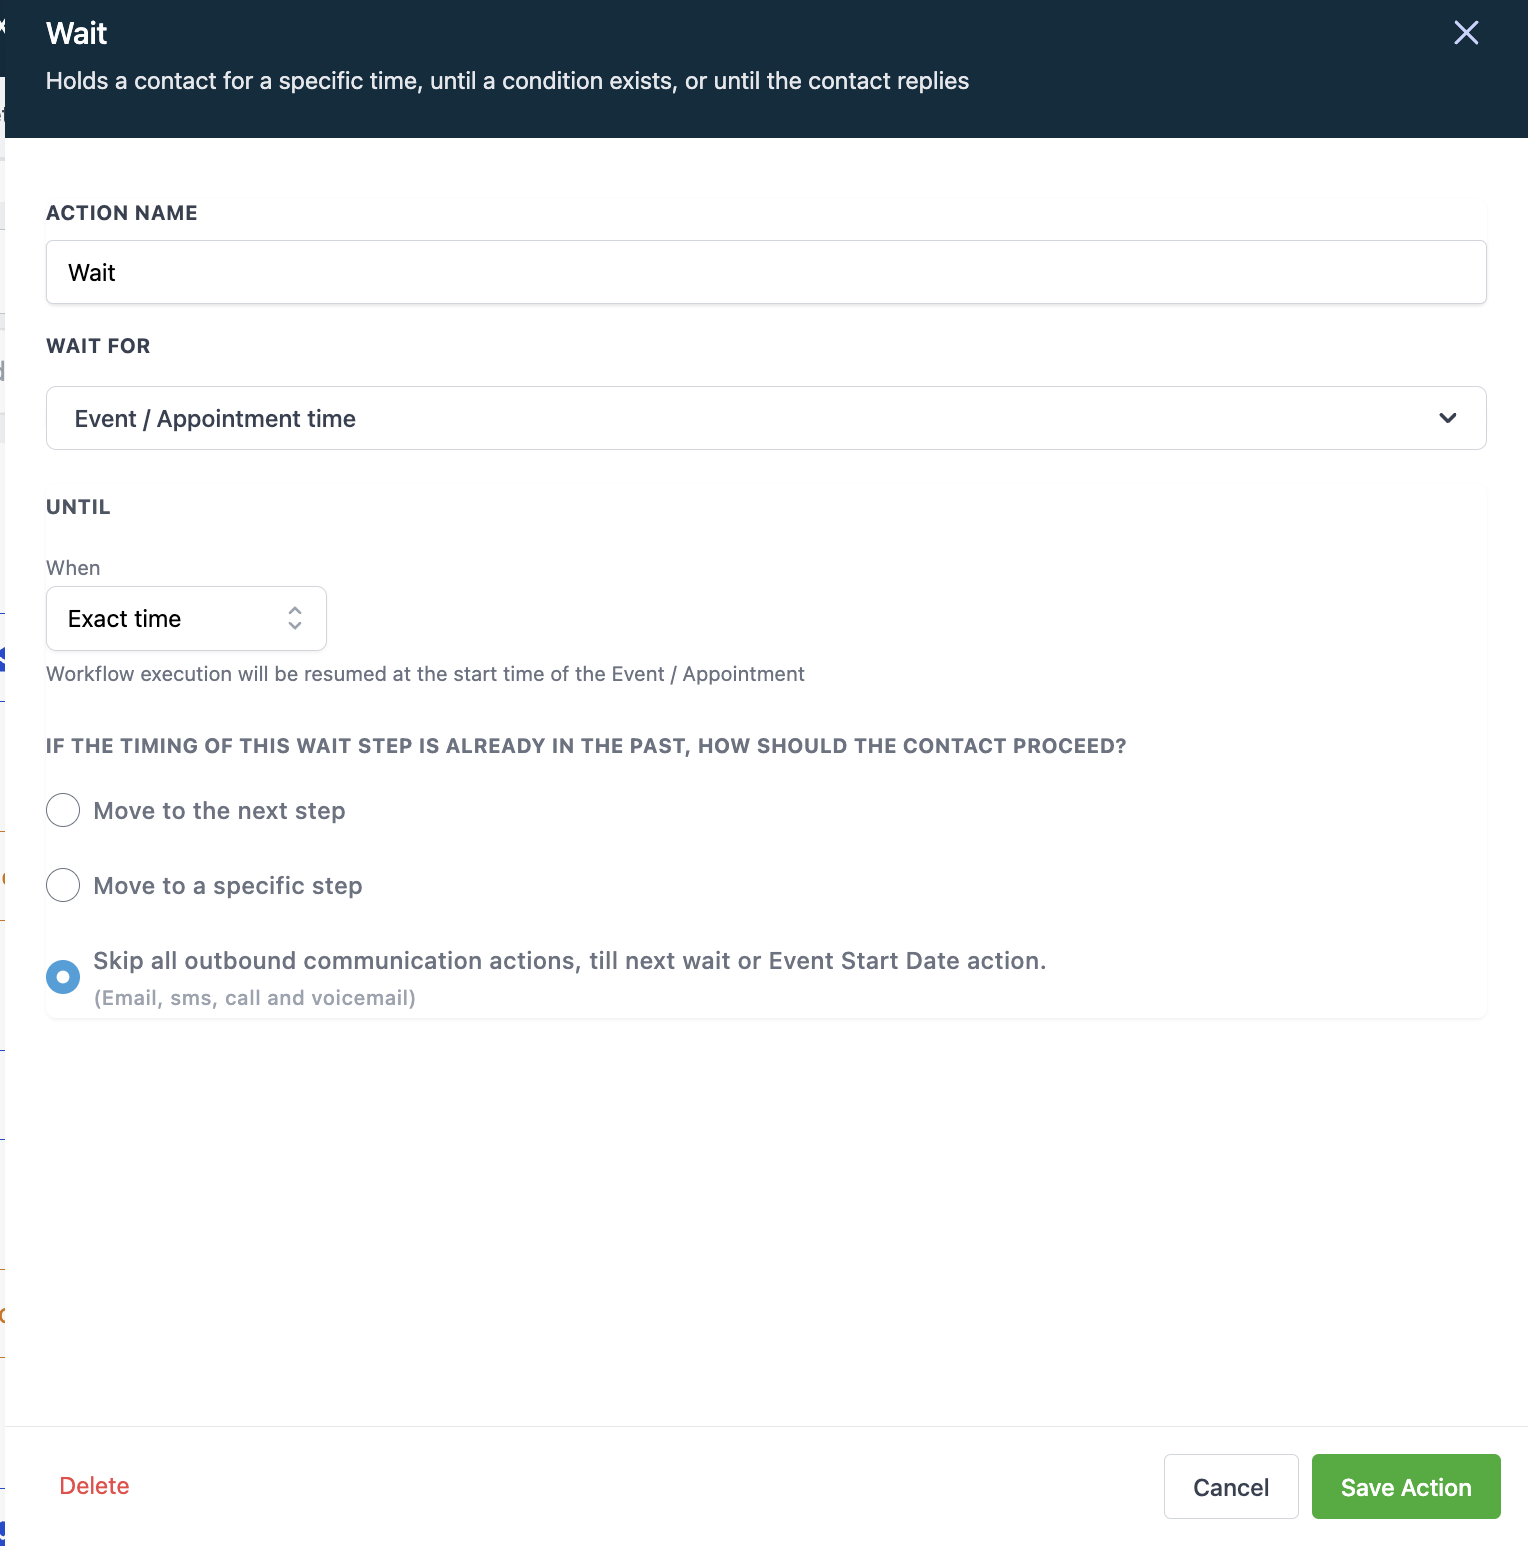
- Event/Appointment time: waits until before, after or the exact time of the event/appointment time
- Choose before or after, and the timeframe
- You can move the Contact to the next step or skip communications
Please Note: The Event/Appointment Time wait step only functions if you have an action to “Set Event Start Time” before it. In this action, you can specify a particular date and time, enabling the “Event Time” wait step to operate, and for the appointment the trigger needs to be Appointment Status in order for that wait step to work properly
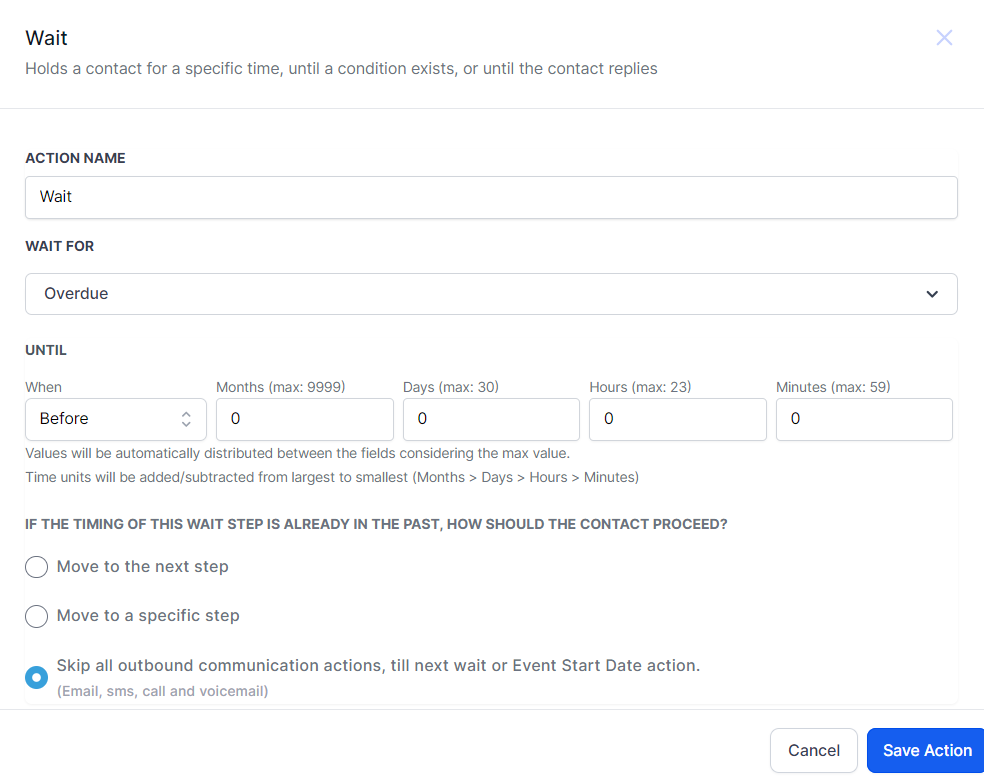
- Overdue: Waits until before or after the invoice due date.
¶ Separate Branches in the Wait Action for Improved Workflow Management
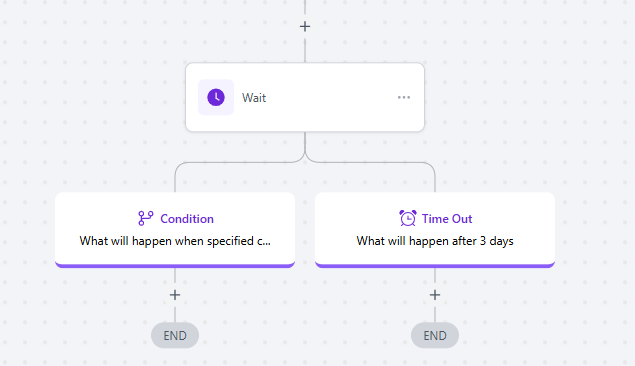
The Wait action offers a more powerful and user-friendly experience by introducing separate branching for conditions and timeouts. This allows users to take distinct actions based on whether a contact meets the wait condition or if the wait period times out. Additionally, text explanations for each branch provide clear guidance on expected outcomes, and dropdown UI offers greater visibility of available options.
** A key benefit **of this enhanced stats view is that users can selectively move or remove contacts waiting on a condition, with a clear “Next Execution Time” displayed. To switch to the new version, simply enable branching from the banner in the older Wait actions and confirm the change. Save your action to apply the update.
Special Requirement:**
**Existing Wait actions will continue functioning as originally set unless manually switched to the new version.

¶ LeadMagicX events:
- Condition: waits for a specific condition to be met (such as a tag being added) - you can customize filters for this to specify your exact condition
- Choose one or more “segments” (condition), and toggle on the timeout if you want to add that feature.
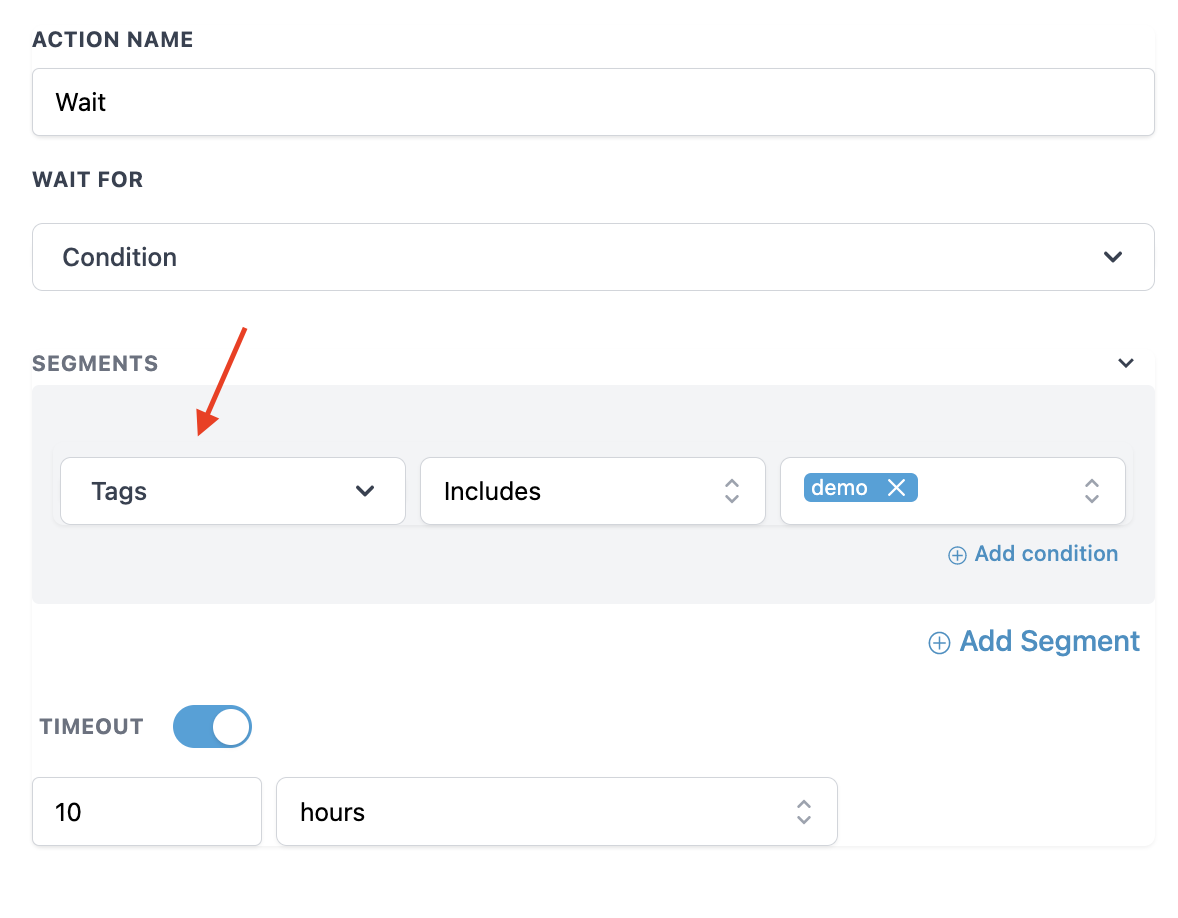
Note: The “Time Out” feature works best with conditions like “Customer Replied”. If the lead does not reply, they will keep waiting at this step. If you want to move this lead forward, you can set up the “Time out” feature to a certain number of days so the lead can move to the next step, whether they reply or not.
Also, When you select “Skip all outbound communication,” then all email, sms or call events between the two wait steps will be skipped until the next wait step.
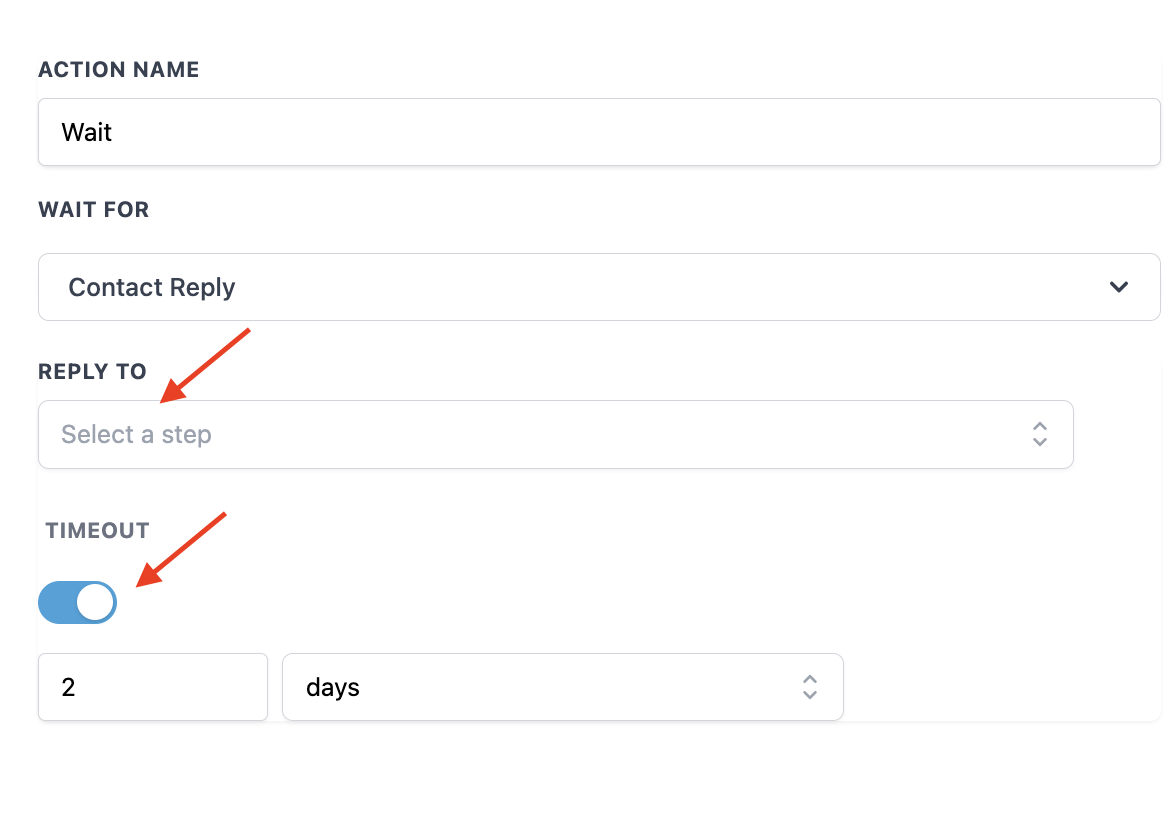
- Contact reply: waits for a contact to reply to a communication
- Choose the “reply to” to select the sms, email, or Live Chat event for the workflow.
- Toggle on the “timeout” setting if you want to add this feature.
Please Note:This will need to be before the wait step, it’s recommended that the wait step directly follow a communication action as certain actions like If/Else will break the connection to the wait step.
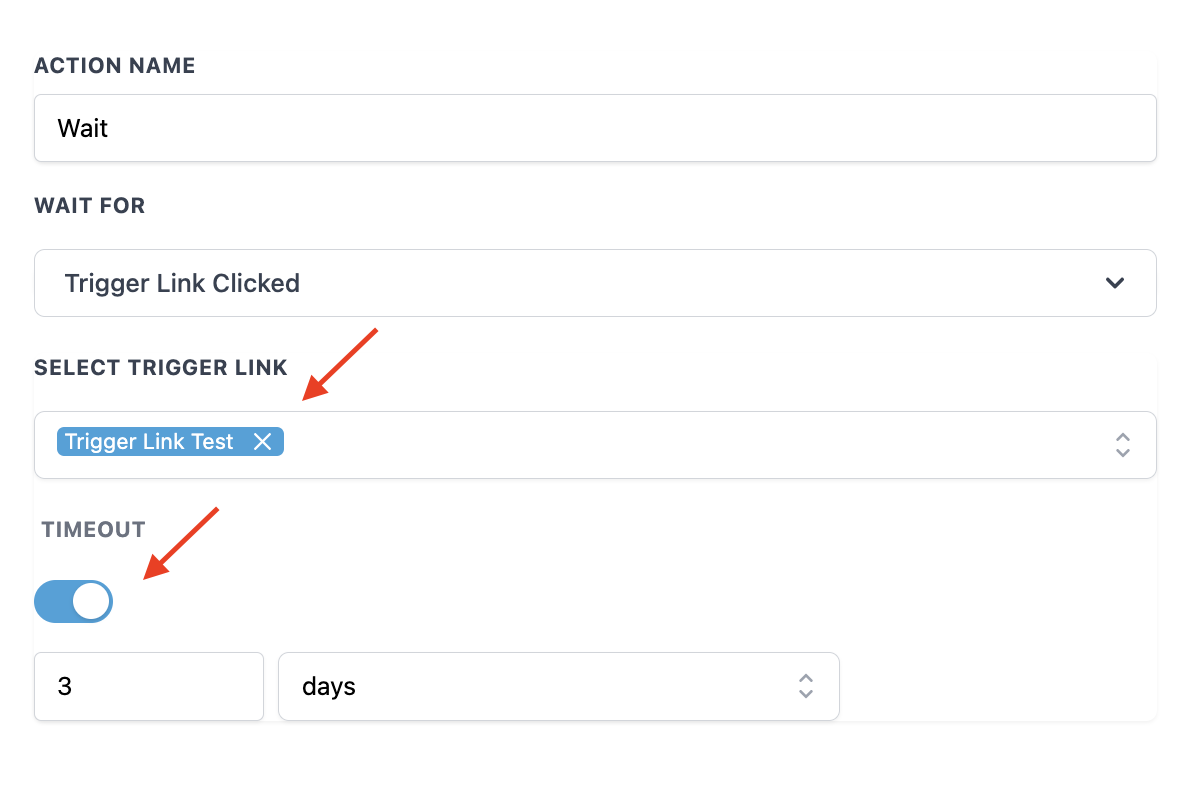
- Trigger link clicked: waits for the trigger link to be clicked
- Choose the specific trigger link and toggle on the timeout if you want to add that feature
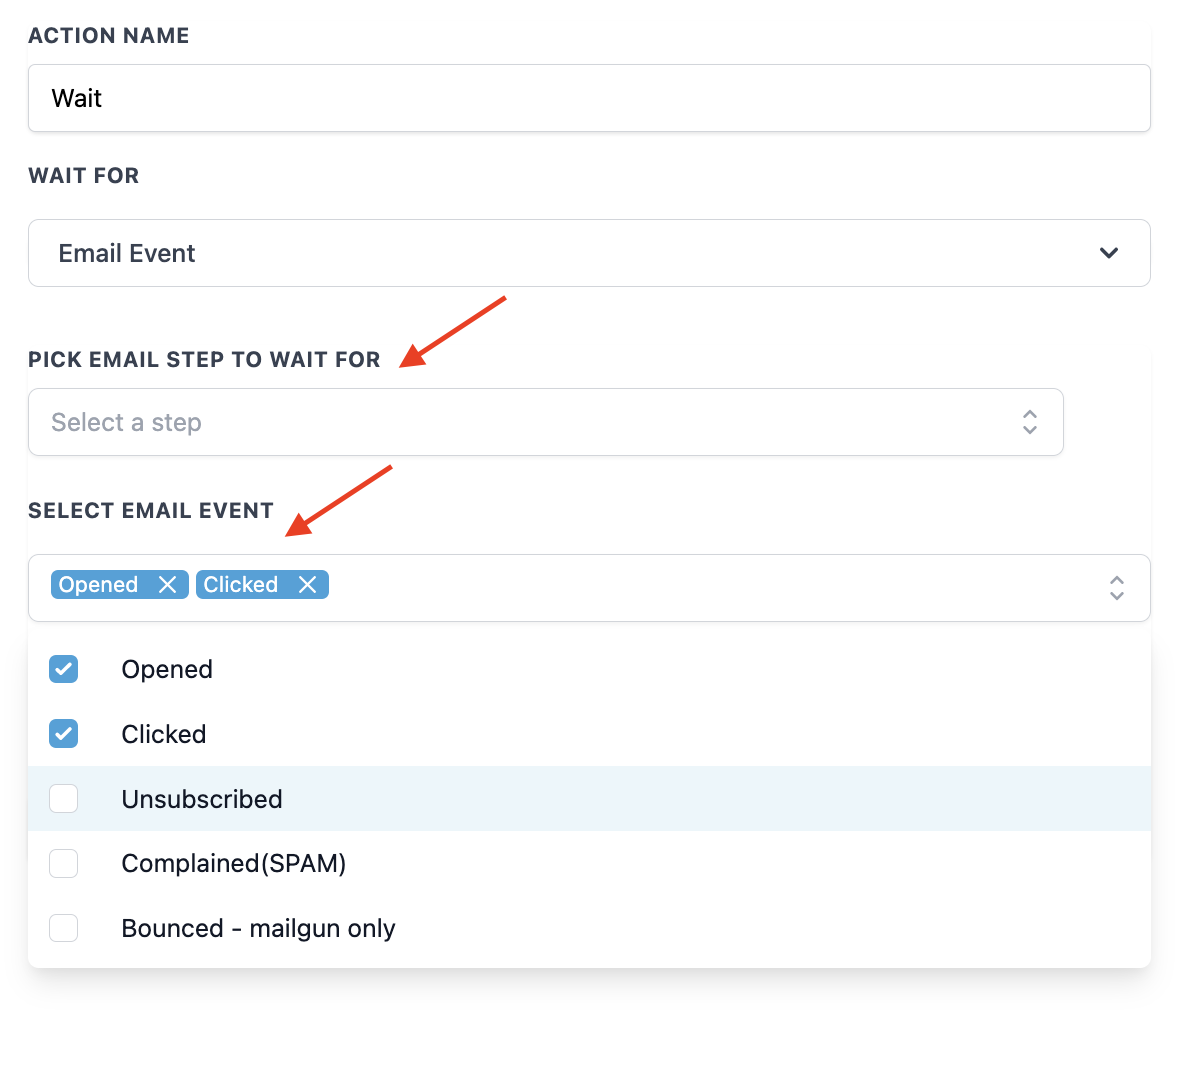
- Email event: waits for specific email events
- Choose the step, determine which event(s) you wish the step to run on, and toggle on the timeout if you want to add that feature
¶ Pro Tips
- Leverage Time-based Waits for Better Timing: Use the “Time Delay” option to space out actions appropriately. Remember to toggle on the “Advance Window” to ensure actions only occur during your desired business hours.
- Set Up Event-based Waits Wisely: For events or appointments, use the “Wait for Event/Appointment Time” to ensure follow-ups or actions occur at the right time relative to your events. Customize the timeframe to fit your schedule precisely.
- Utilize Overdue Waits for Billing: The “Overdue” option is useful for managing invoices. It ensures follow-up actions or reminders are sent based on invoice due dates, helping you keep track of outstanding payments.
- Customize Conditions with Filters: When using the “Condition” Wait action, leverage filters to specify exact conditions. This allows for highly targeted workflows, such as waiting for a specific tag to be added.
¶ FAQs
Question: How do I set a time-based wait in the Workflow Builder?**
**Answer: In the Workflow Builder, add a Wait action, then choose “Time Delay” from the options. Specify the duration for which you want to wait before moving to the next step. Use the “Advance Window” feature to define specific operating hours if needed.
Question: Can I configure a wait action to occur before or after an event?**
**Answer: Yes, choose the “Event/Appointment Time” option in the Wait action. Select whether you want to wait before, after, or at the exact time of the event. Specify the timeframe for the wait period.
Question: What is the “Time Out” feature and how do I use it?**
**Answer: The “Time Out” feature allows you to move contacts to the next workflow step if a specified condition is not met within a set timeframe. It is useful for ensuring contacts don’t remain indefinitely waiting for a condition.
Question: How do I use the “Contact Reply” wait action?**
**Answer: Select the “Contact Reply” option in the Wait action and choose the communication event (SMS, email, or live chat message) to wait for a reply. Toggle on the “timeout” setting if you want to specify how long to wait before moving to the next step.
Question: Can I wait for a trigger link to be clicked?**
**Answer: Yes, use the “Trigger Link Clicked” wait action. Select the specific trigger link to wait for and toggle on the “timeout” setting if you want to add a timeout feature.
Question: What should I do if the wait step is not working as expected?**
**Answer: Ensure the wait step is correctly placed directly after a communication action and check for any conditional logic or advanced settings that might affect the wait step’s functionality.
Question: Can I wait for multiple conditions at once?**
**Answer: Yes. When using the “Condition” wait type, you can add multiple segments. You can decide if the contact needs to meet all conditions or just one of them to move forward.
Question: If I select “Skip all outbound communication” in an Appointment wait, which actions are ignored?
Answer: This will skip any Email, SMS, or Call actions that exist between that Wait step and the actual appointment time. This is useful for “Reminder” workflows where you want to stop sending “Don’t forget to book” messages once the person has actually booked.
Question: How do I move someone out of a “Wait” step manually if they call me instead of replying?
Answer: You can go to the Workflow Stats view, find the contact waiting on that step, and select “Move to next step” or “Remove from workflow.”