¶ Payment Links
Payment Links are a versatile tool that simplifies online selling for businesses worldwide, including SMEs and entrepreneurs. By eliminating the complexities of traditional website setups, Payment Links offer an efficient solution for conducting online transactions.
¶ Utilizing Payment Links:
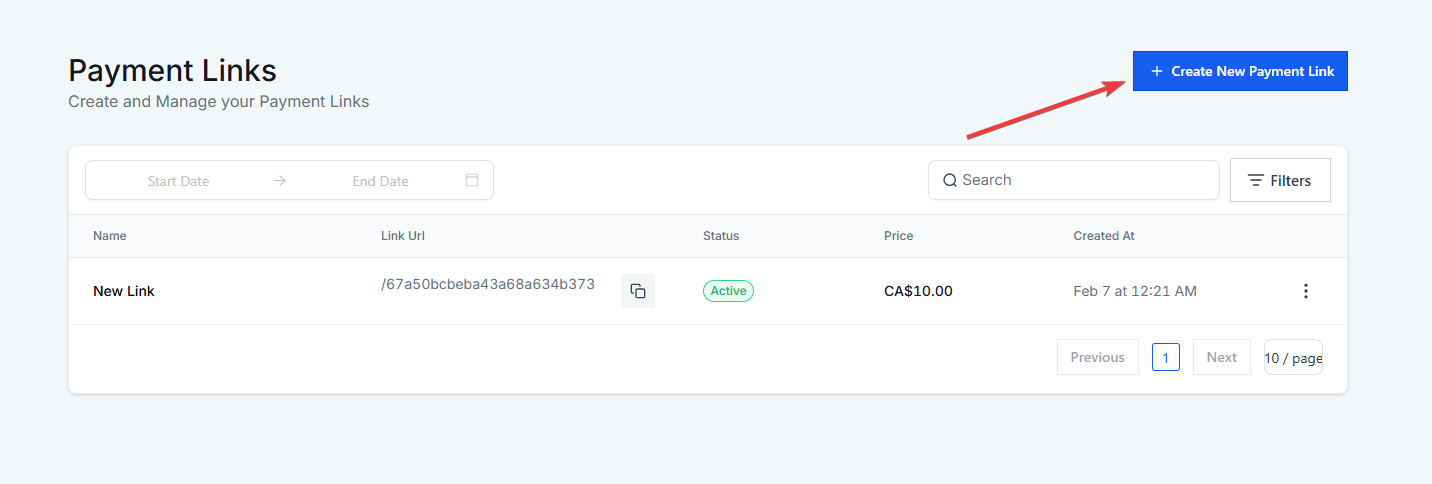
1. Access the Payments Section: Log in to LeadMagicX platform and navigate to the Payments section from the main dashboard.
2. Find Payment Links Feature:
Once in the Payments section, locate the Payment Links feature located at the top.
3. Initiate Creation Process:
Click on the Payment Links feature to begin creating a new payment link for your products or services.
4. Configure Payment Link Settings:
Within the Payment Links interface, you’ll have the option to configure various settings to tailor the payment link according to your specific requirements. This includes:
- Product Selection: Choose the product or service for which you want to create the payment link. You can bundle multiple one-time products and recurring services in a single payment link. Add your products, configure options like quantity adjustments and coupon codes, and then share the link via email, social media, or embed it on your website.
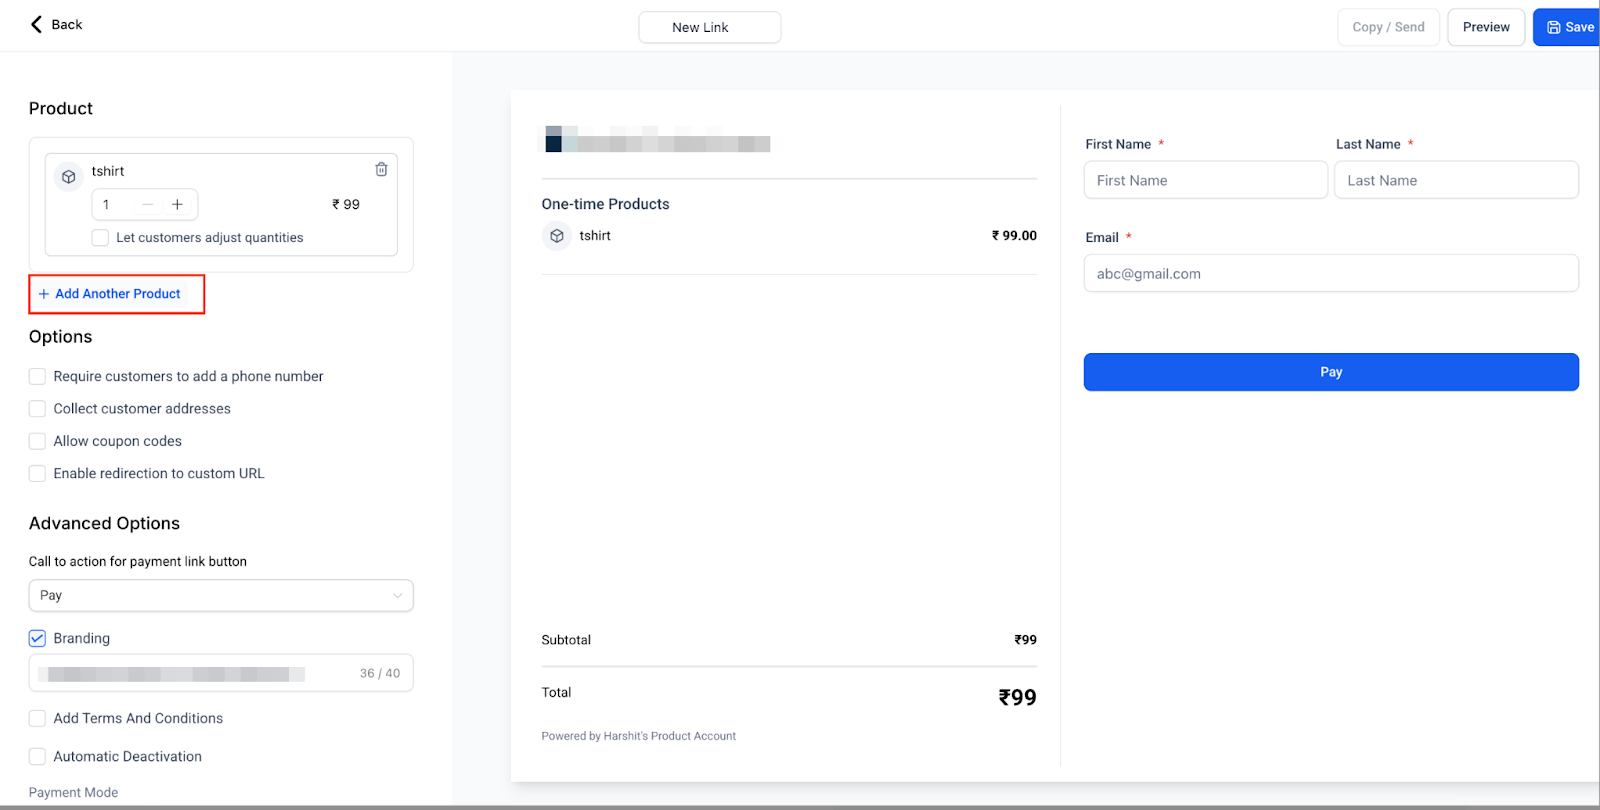
- Pricing: Set the pricing for your product or service, including options for one-time purchases or recurring subscriptions.
- Billing Frequency: Specify the billing frequency, such as monthly, weekly, or custom intervals, for recurring payments if applicable.
5. Additional Settings:
Explore additional settings that may be available, such as:
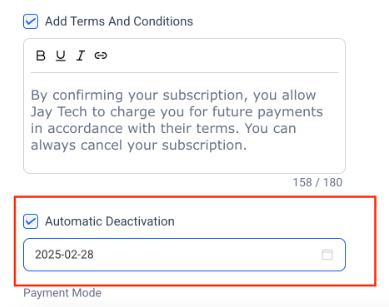
- Set a deactivation date for any payment link. Once the configured date is reached, the link will automatically become inactive.
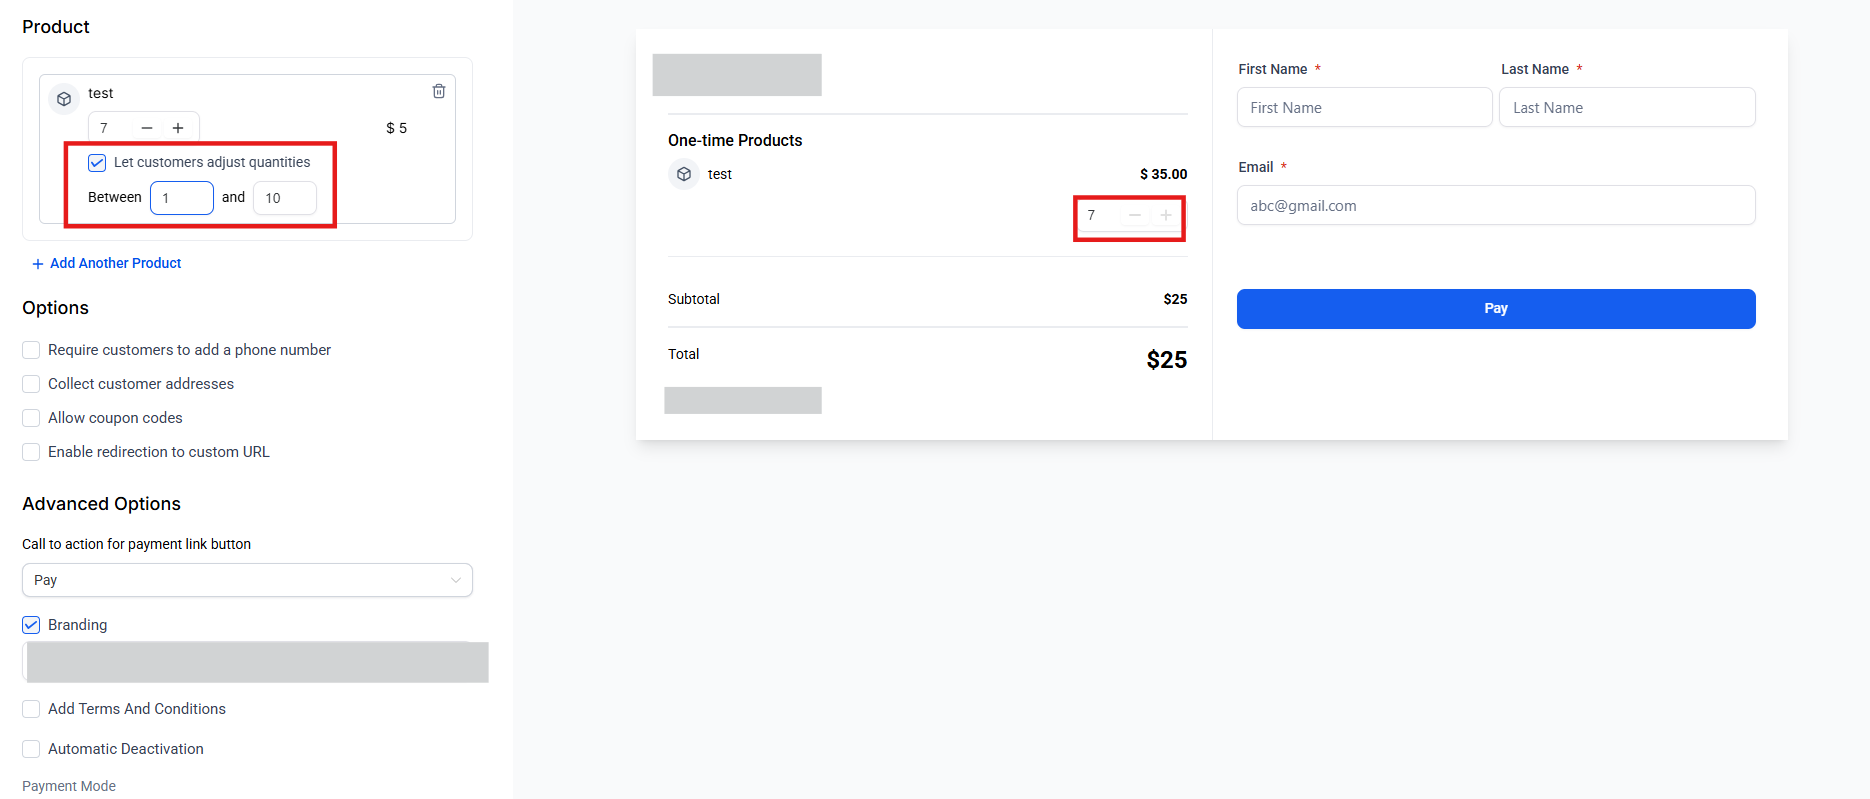
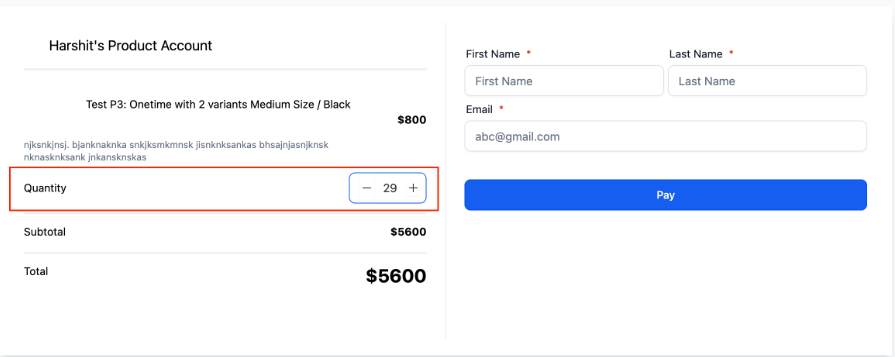
- Editable Quantities for Customers: Allow customers to adjust product quantities directly on the payment links you send them. You can set minimum and maximum limits. For example, you might set the quantity range between 1 and 10 so the customer will not be able to place an order of more than 10. Remember to save your settings and ensure the payment link is in live mode for real transactions.

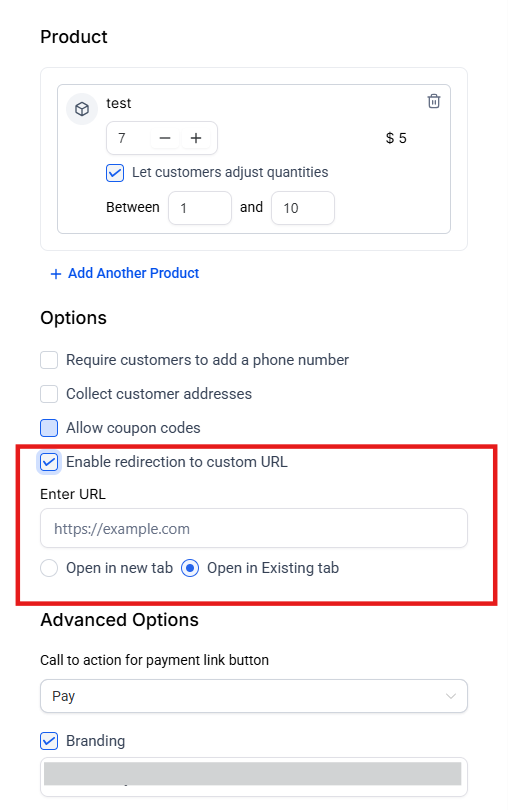
- Custom URL Redirection for Payment Links: Redirect customers to a custom URL after completing a payment via payment links.
- Custom Terms and Conditions: Customize the terms and conditions displayed below the Pay button for Payment Links, allowing more control over the information presented to customers. This feature supports adding hyperlinks within the terms and conditions, directing users to detailed pages if needed.

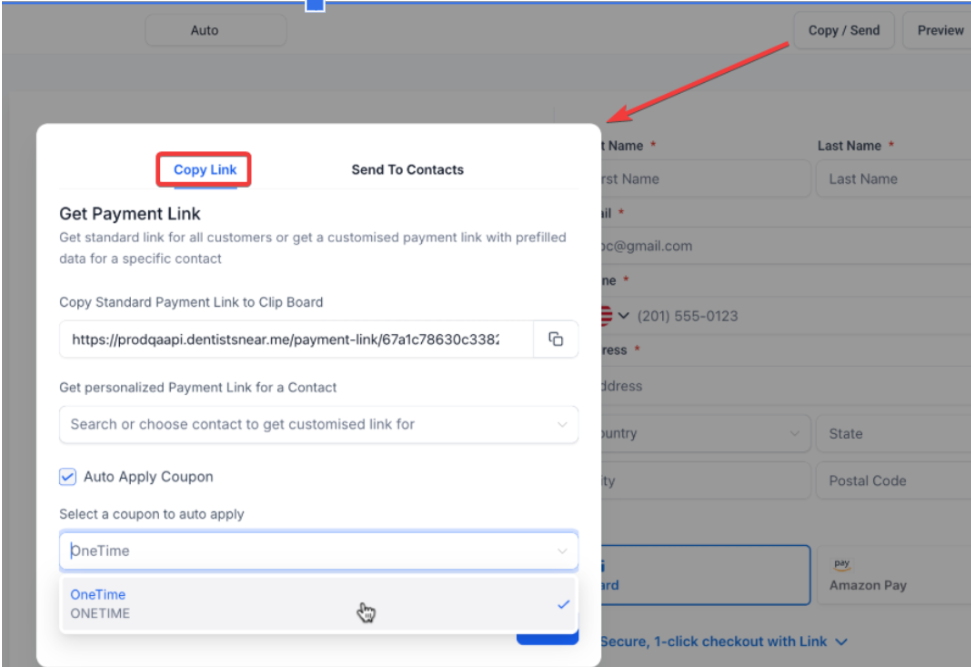
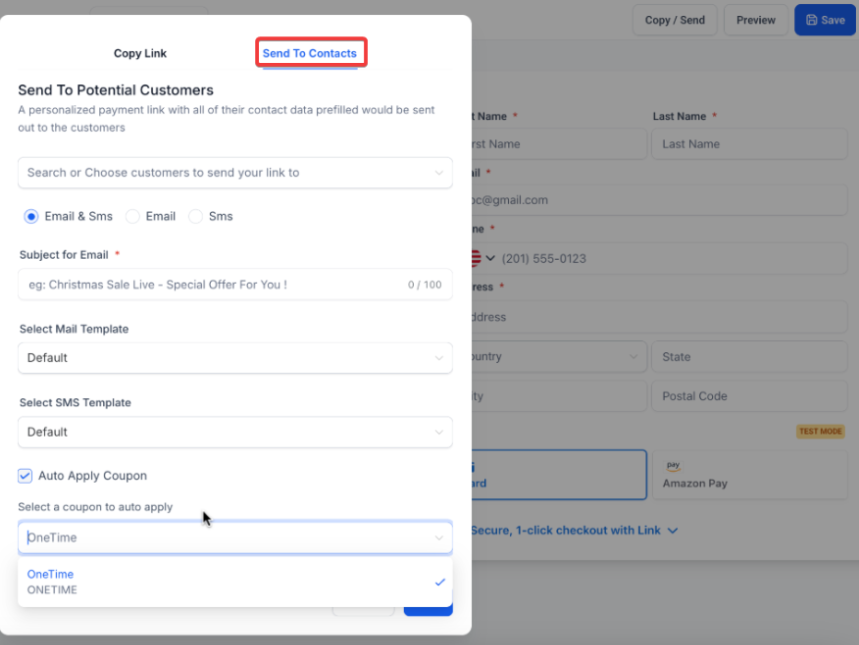
- Allow Coupon Codes: Check the option to include coupon codes. Input the desired coupon code into the designated field and save. Customers can then use the provided coupon code during checkout to avail of discounts or incentives associated with the payment link.
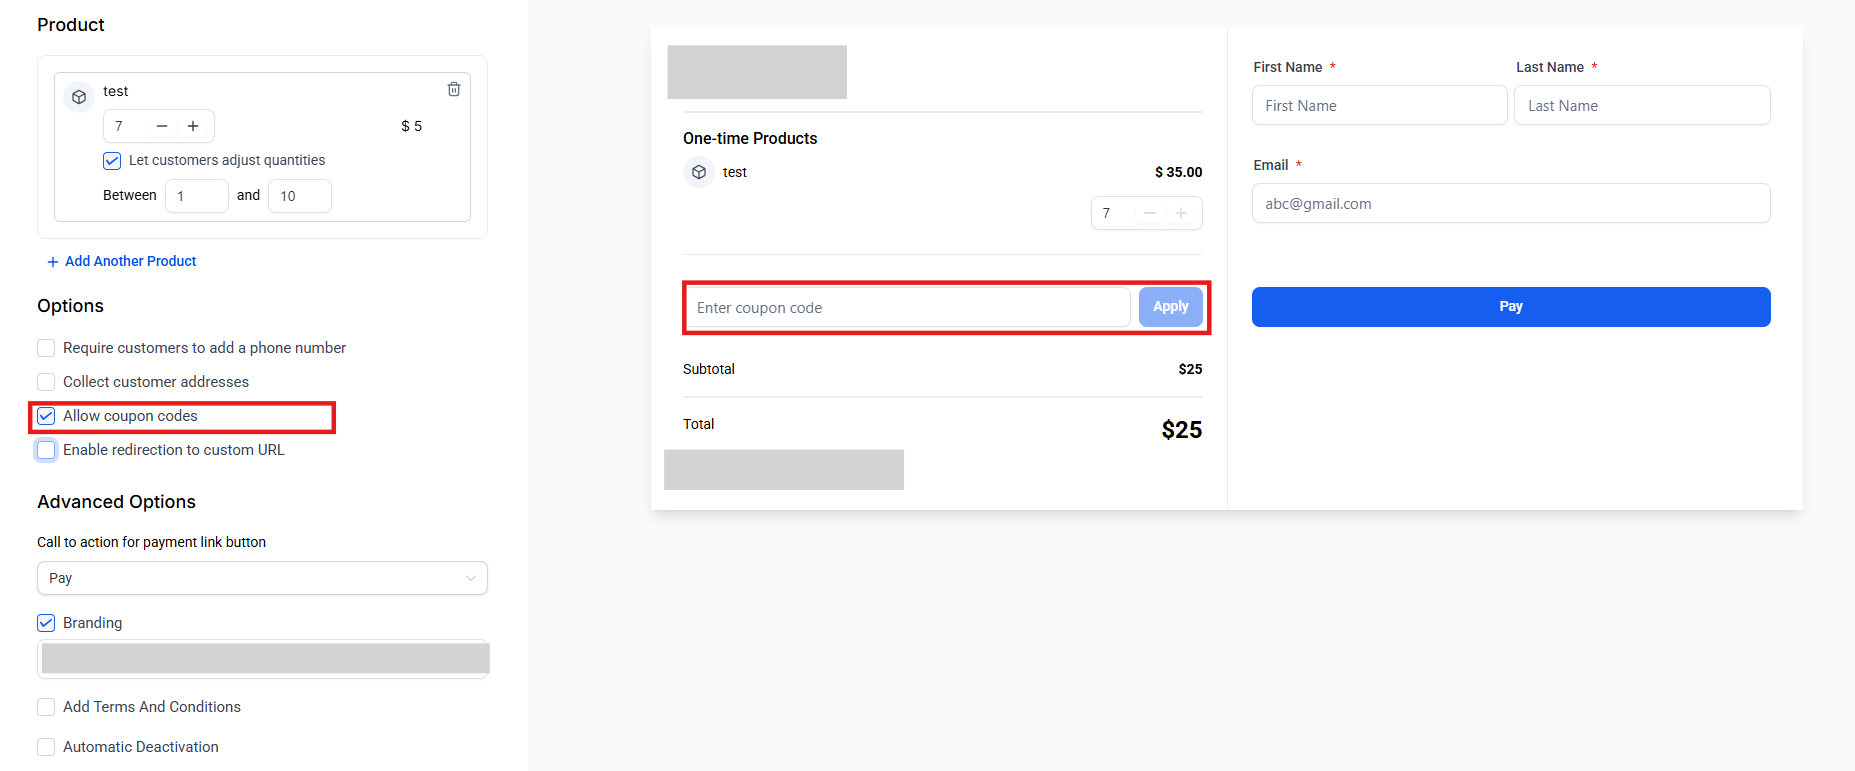 

Note: You may also auto-apply coupon codes when sending payment links. On opening the link, the codes will be applied automatically.
**6. Customize Payment Links: **
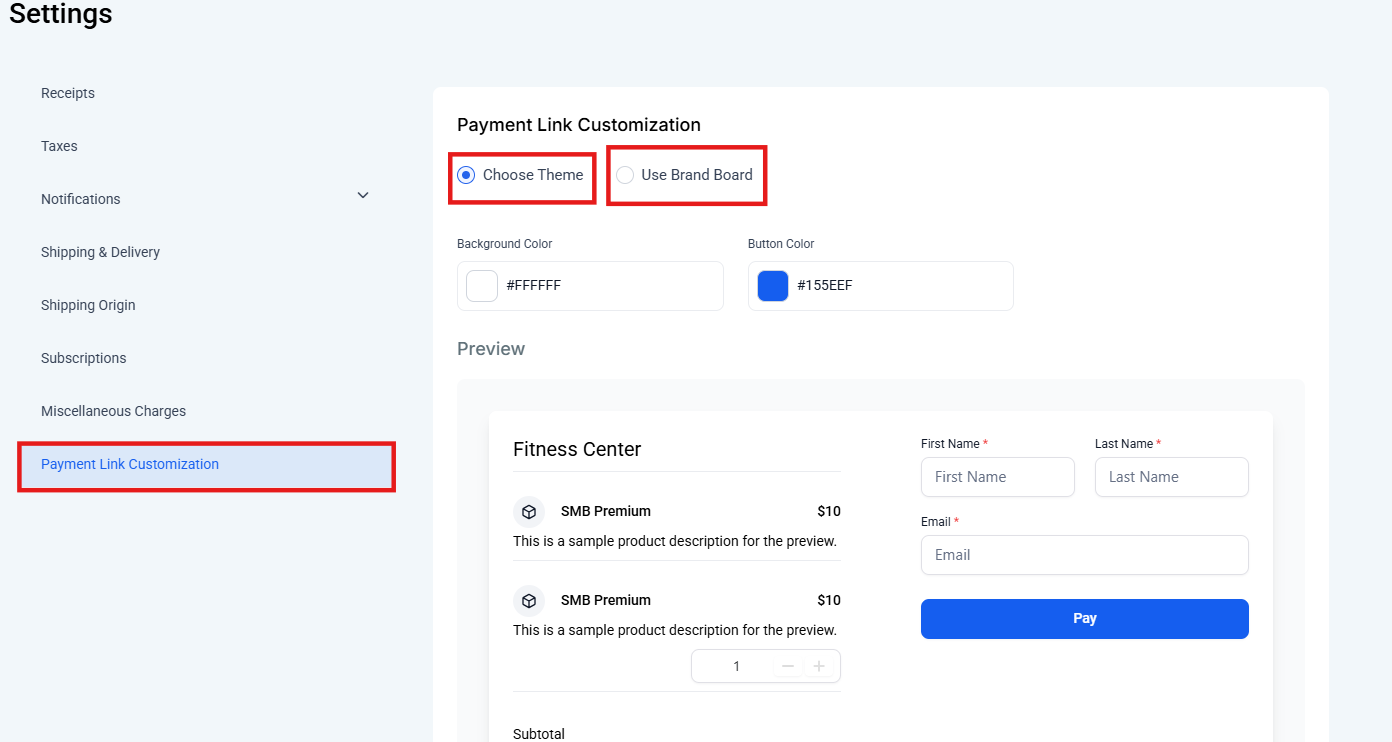
Customize the appearance and functionality of the payment link to align with your brand and preferences. This may include branding elements, button text, and other visual or textual customization options.
Go to the Payments section, access Settings, and choose between applying your Brand Board or customizing your colors with the “Choose Theme” option. Once saved, all your payment links will display the selected theme.
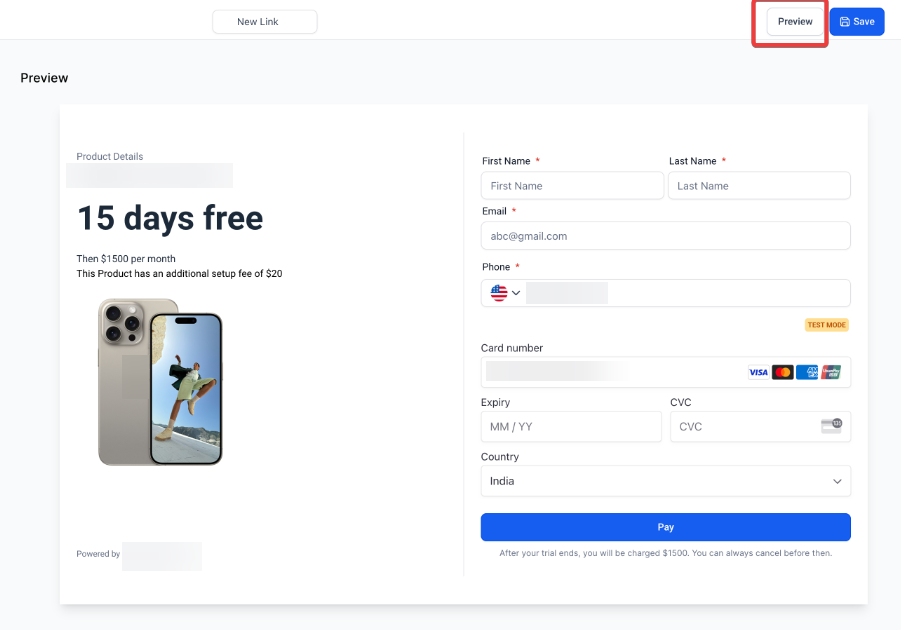
7. Preview the Payment Link:
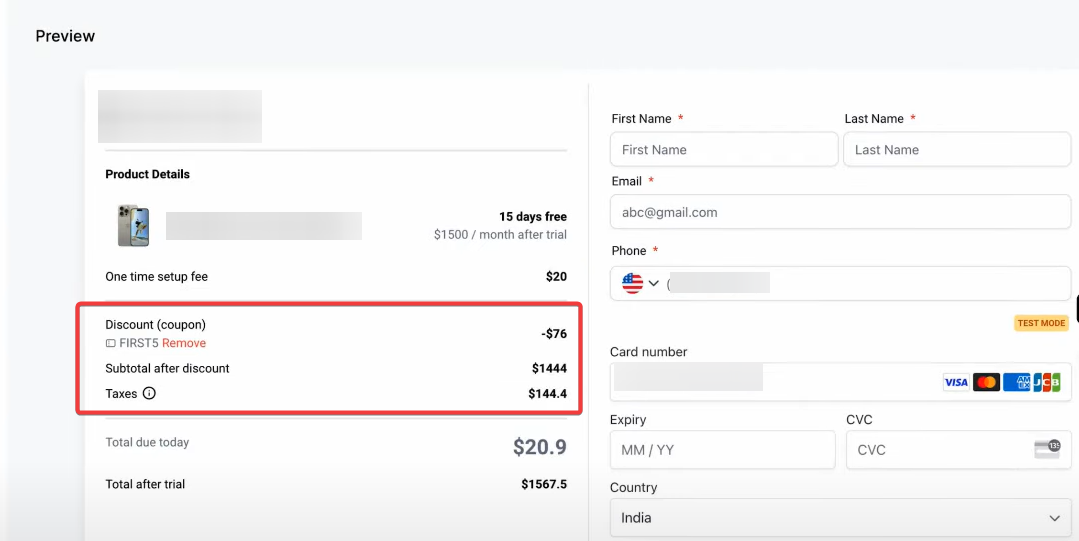
Before finalizing, take advantage of the preview feature on the right side of the menu to review how the payment link will appear to customers.
8. Save and Share the Payment Link:
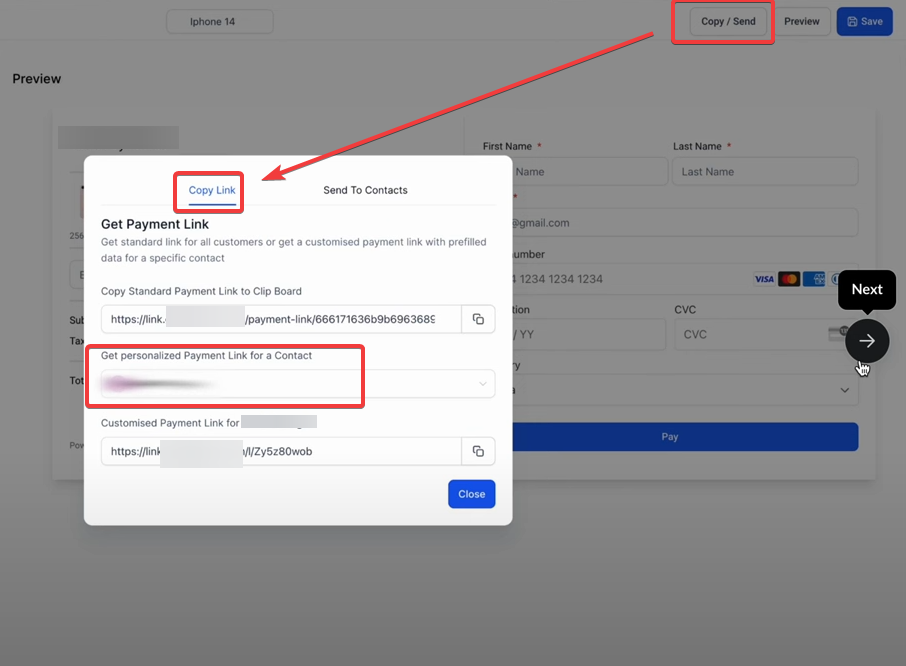
- Personalized Payment Links: To use personalized payment links, navigate to the payment link section and create a new link. Select multiple contacts from the dropdown menu to generate personalized links, then configure email and SMS templates to include these links. You can use default templates or create custom ones, ensuring placeholders for contact-specific data are included.
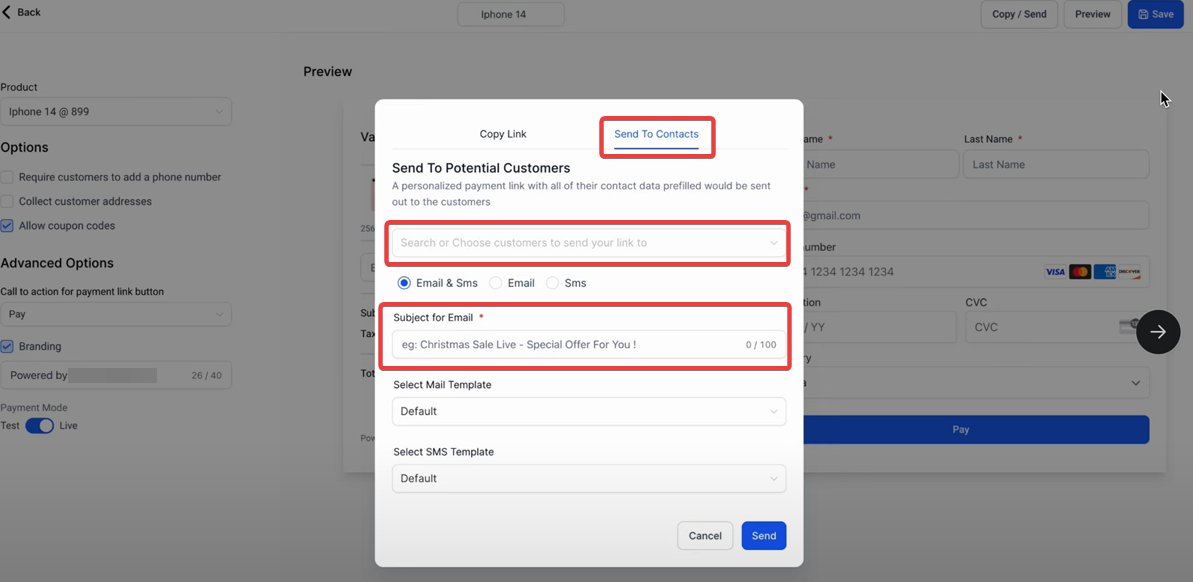
- Copy the standard or personalized links and send them via your preferred method. When recipients open the personalized links, their information will be pre-filled, making the payment process quicker and more efficient.
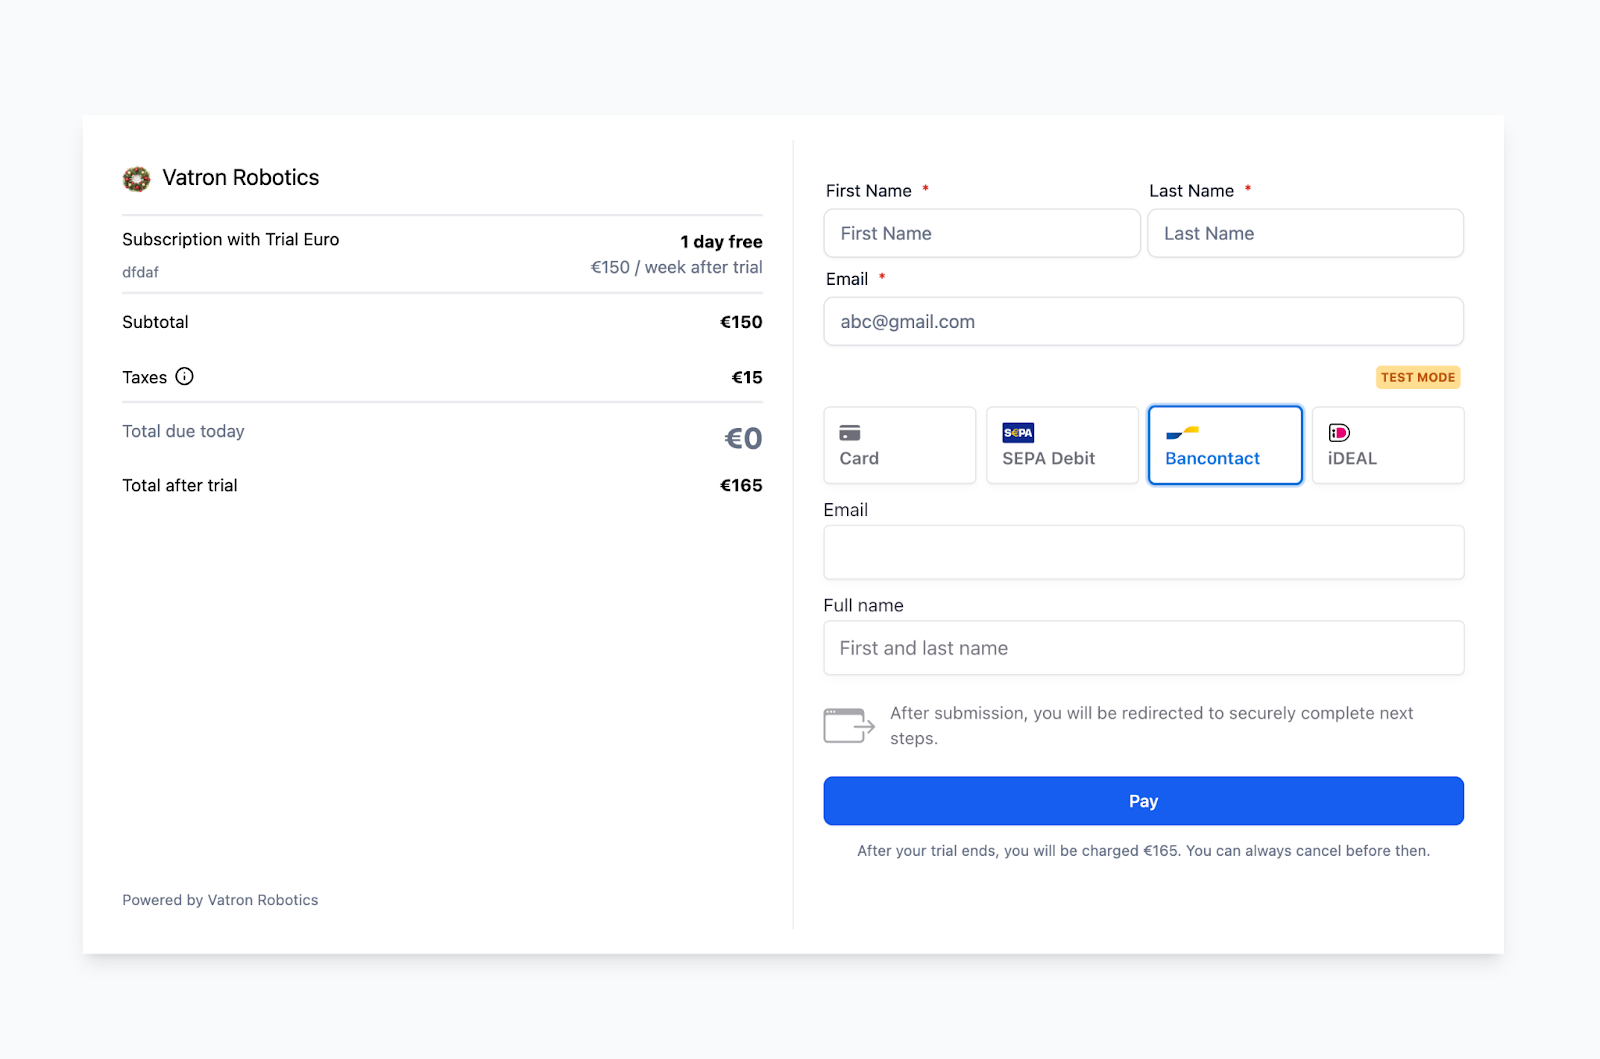
Note : Businesses using Stripe can offer additional payment methods
IDeal - popular in the Netherlands
Bancontact - common payment method in Belgium
Sepa Direct Debit - common payment method in the European Union
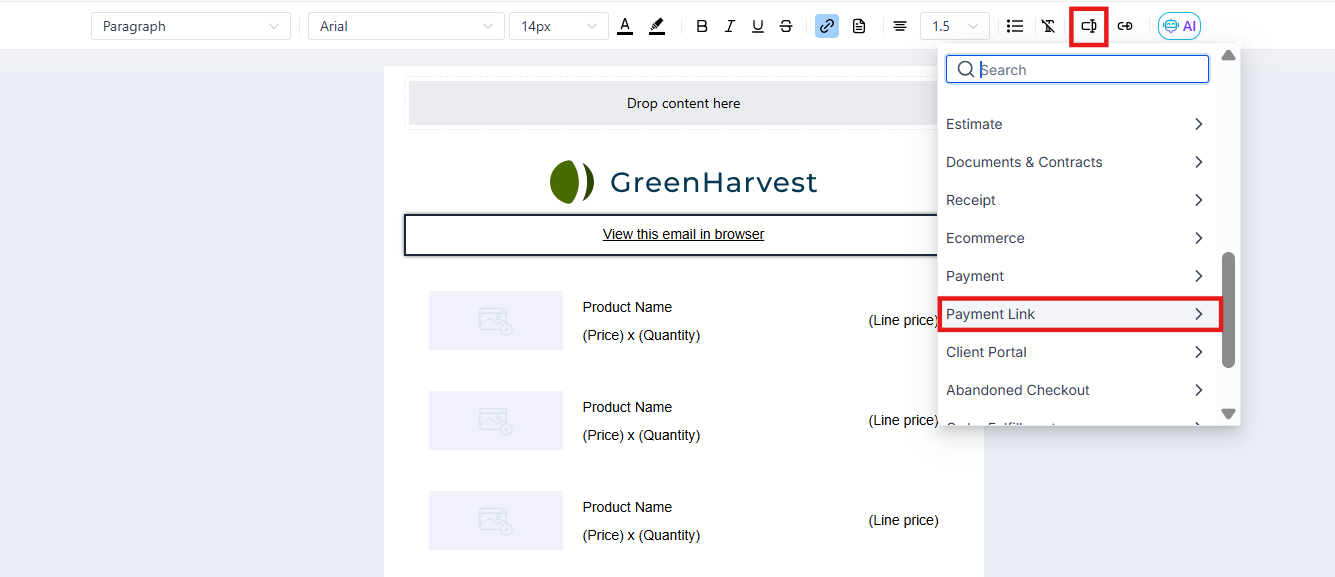
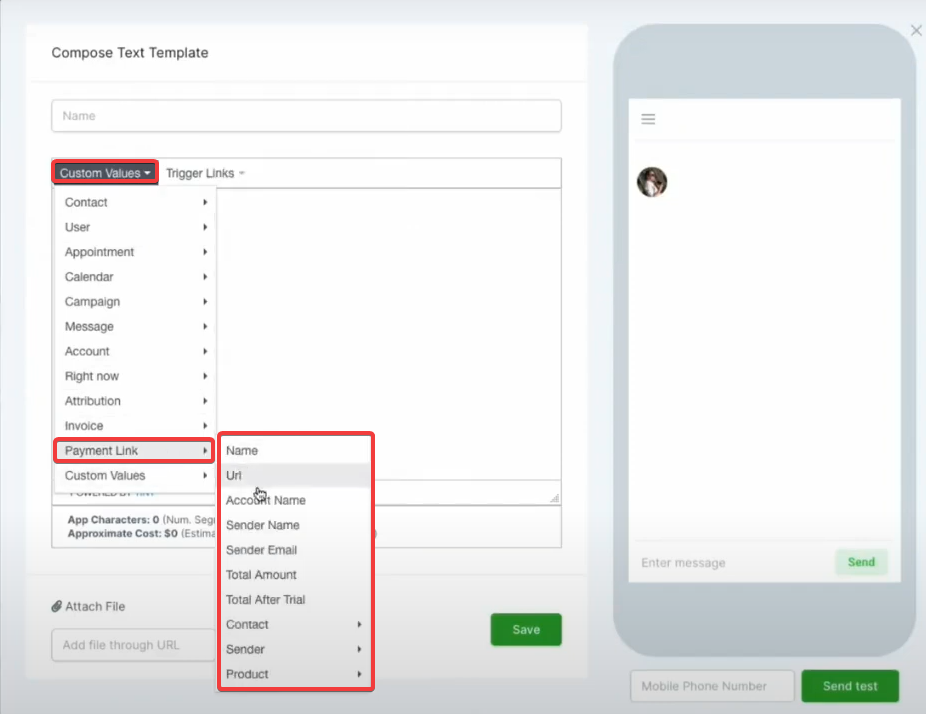
9. Integrate Payment Links into Templates:
- Access Marketing Templates : Navigate to the email or SMS template section in your marketing tools.
- Insert Payment Link : Use the custom values feature to insert the personalized payment link into your template.
- Save and Deploy : Save your template and use it in your campaigns to send personalized payment links effortlessly.

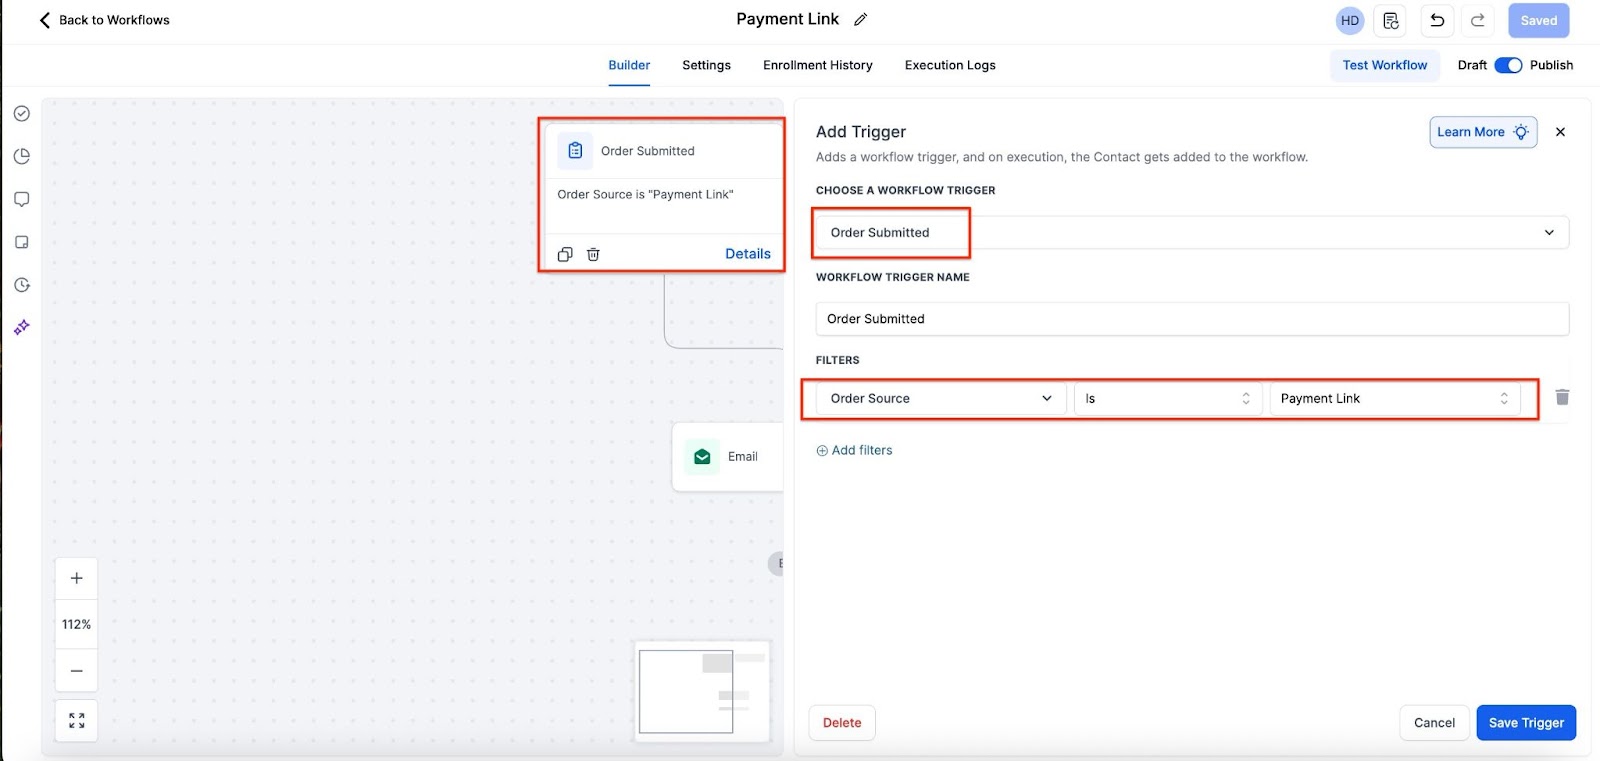
¶ Triggers for Payment Links
Automate post-purchase workflows using the Order Submitted Trigger for payment links, enabling tailored actions like sending confirmation emails or updating records.
¶ FAQ’s
Question: Can I set an expiration date for a payment link?**
**Answer: Yes, you can configure a deactivation date, and once that date is reached, the payment link will automatically become inactive.
Question: Can customers adjust the quantity of items when using a payment link?**
**Answer: Yes, you can enable editable quantities and set minimum and maximum limits to control the number of items a customer can purchase.
Question: Is it possible to apply coupon codes to payment links?**
**Answer: Yes, you can allow customers to enter coupon codes at checkout or set up auto-applied coupon codes when sending payment links.
Question: Can I redirect customers to a custom page after they complete a payment?**
**Answer: Yes, payment links support custom URL redirection, allowing you to send customers to a specific page after successful payment.
Question: How can I personalize payment links for individual customers?**
**Answer: You can generate personalized payment links by selecting multiple contacts when creating a link. These links can be included in customized email or SMS templates, pre-filling customer details for a seamless payment experience.
Question: Can invite links be shared outside the platform?**
**Answer: Yes. Links can be shared via email, messaging apps, social media, or other communication channels.
Question: What happens if a customer clicks an “Expired” link?
Answer: If you set a deactivation date and the customer clicks the link after that time, they will see a polite message stating that the offer is no longer available. This is perfect for limited-time promotions or “Early Bird” specials.