¶ 101 Guide: How To Build, Edit, And Utilize Forms
101 Guide: How To Build, Edit, And Utilize Forms
Using forms can be a great way to capture information for new leads and many other aspects of your business. Understanding how to use the form builder is critical to best using the system and customizing it for your business needs. You can add elements to capture the information you need from your leads. All style, design, and option tools are conveniently located on the right. Tailor your forms precisely, customizing layouts, colors, and other stylistic elements.
¶ Overview of the Forms Feature
- Navigate to Forms. You’ll see 3 tabs: Builder, Analyze, and Submissions
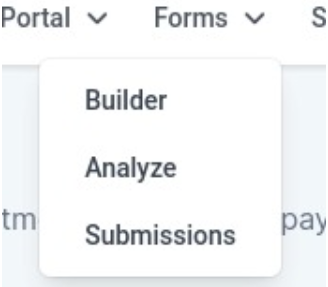
- “Builder” features a list of all your existing forms. You can also create a new form from this page.
- “Analyze” gives you an overview of the number of submissions, as well as a graph. You can sort by form, choose a specific period, and more.
- “Submissions” allows you to sort through the submissions for all forms or select a specific form. You can also search for a specific submission by name, email, phone number, or contact ID.
¶ Step 1: Creating a Form
- Navigate to Sites > Forms, click on Builder, then + Add Form , and then Start from Scratch or choose a template.
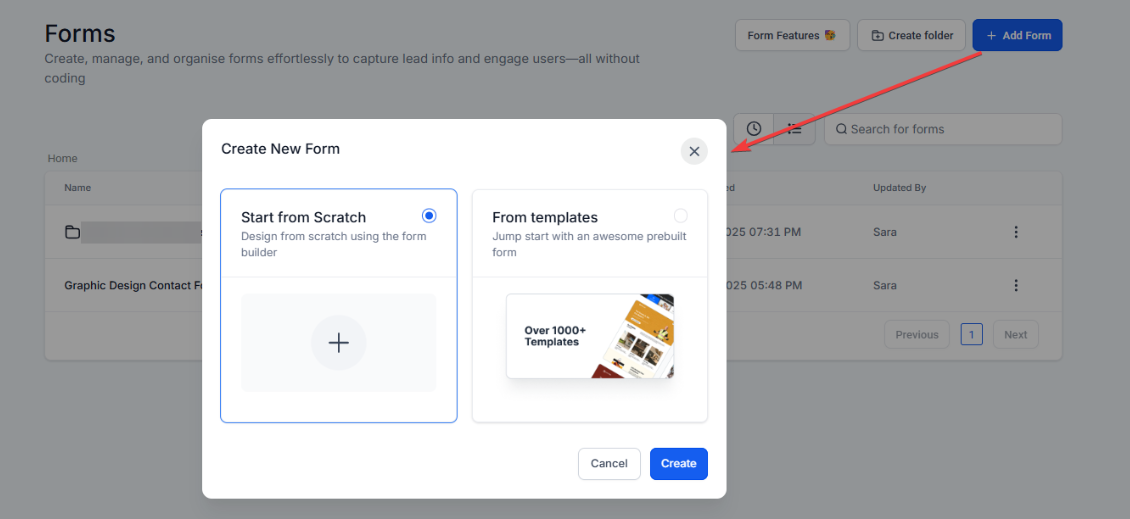
Note: You can also click on edit on an already existing form to edit more.
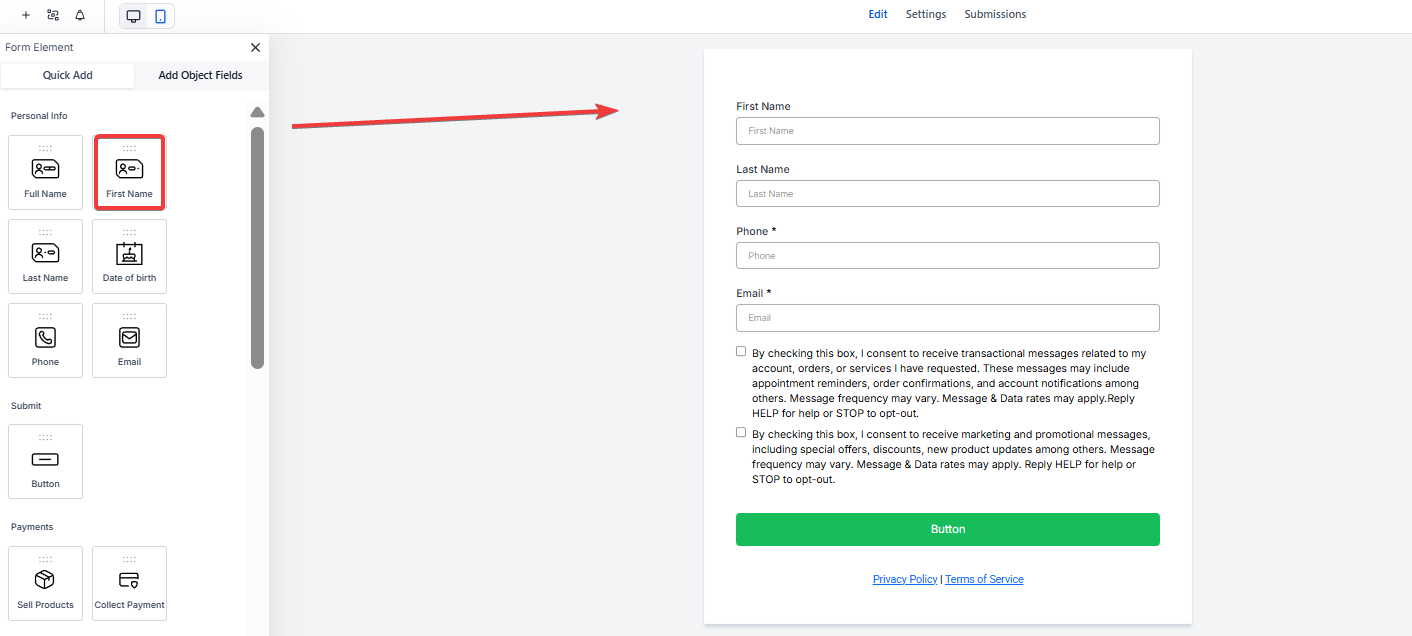
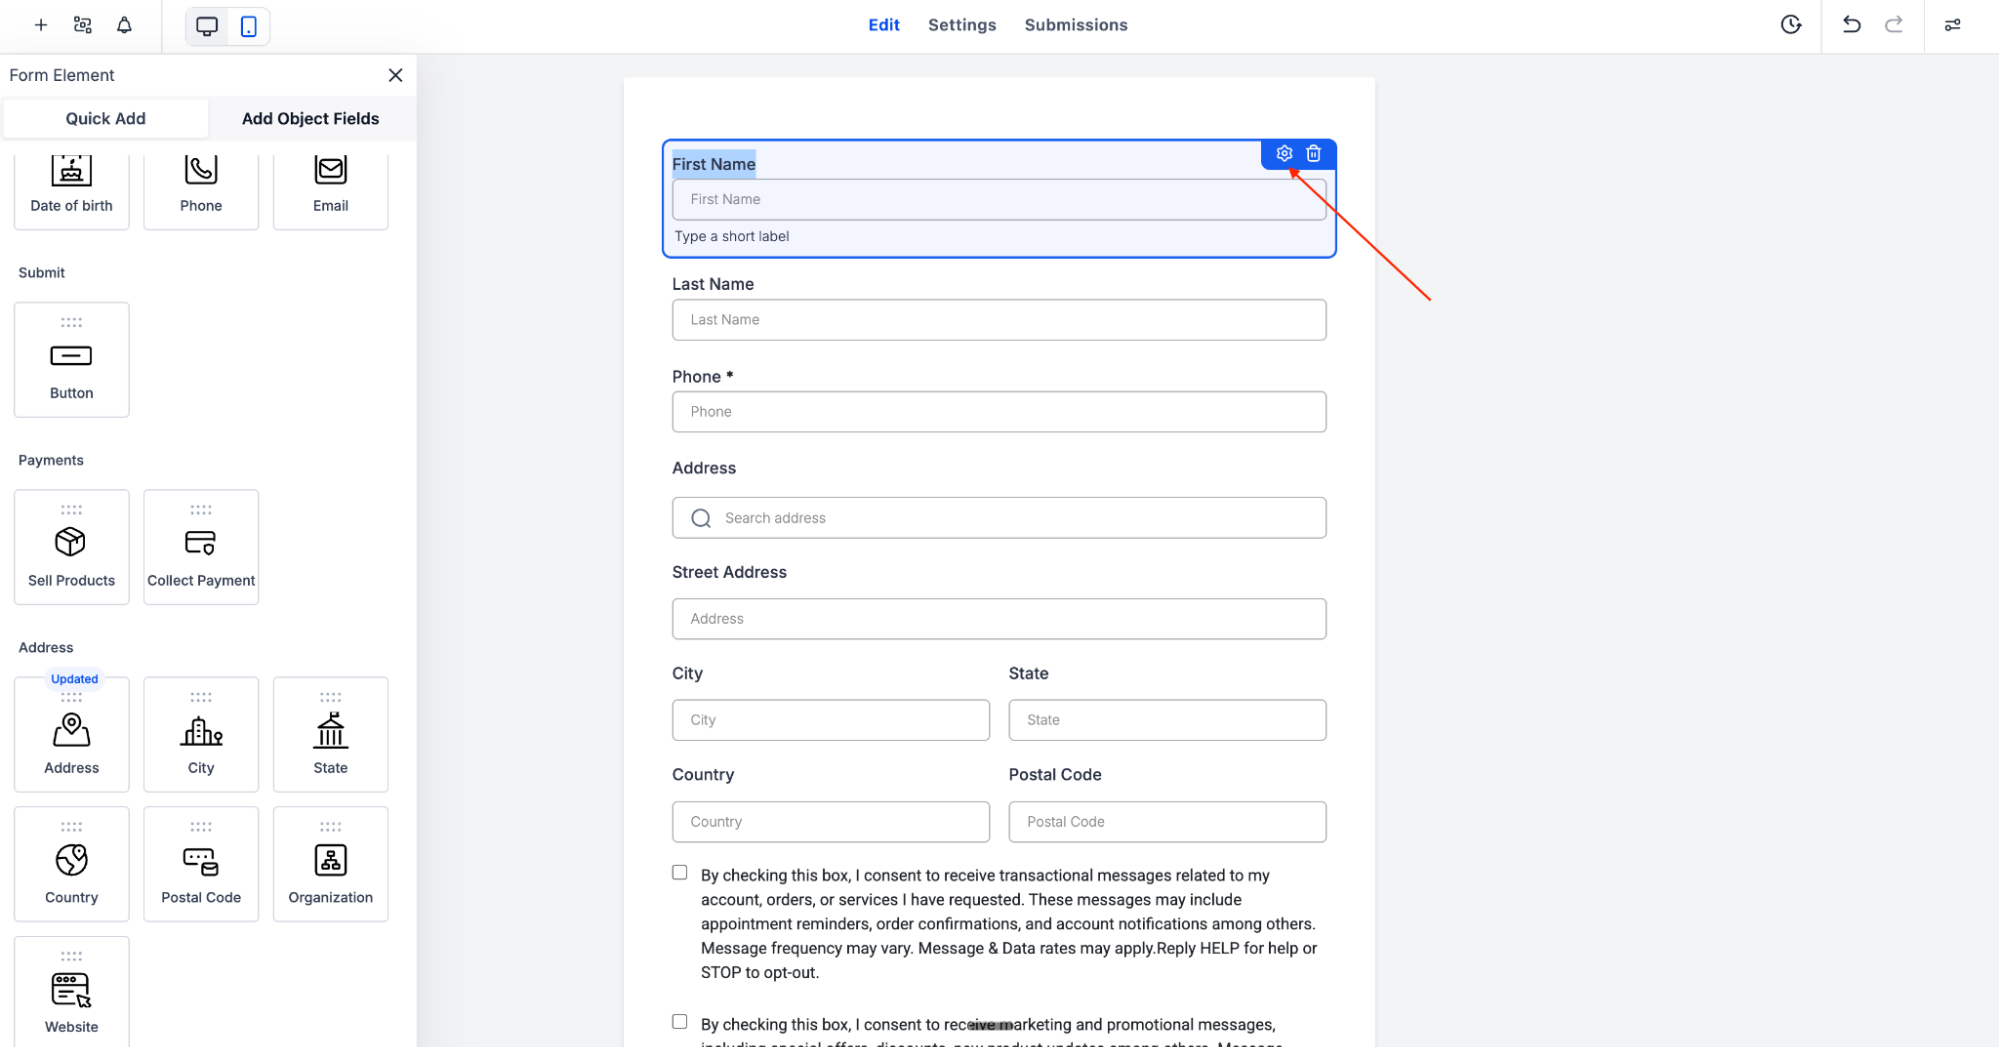
¶ Step 2: Edit your Form by Adding Elements
- You can edit the name of the form by clicking on the pencil to edit

- Click the + sign on the left to see all the available elements.

- Once you see the one you need, click on it, drag it, and drop it into the position where you want it to be.
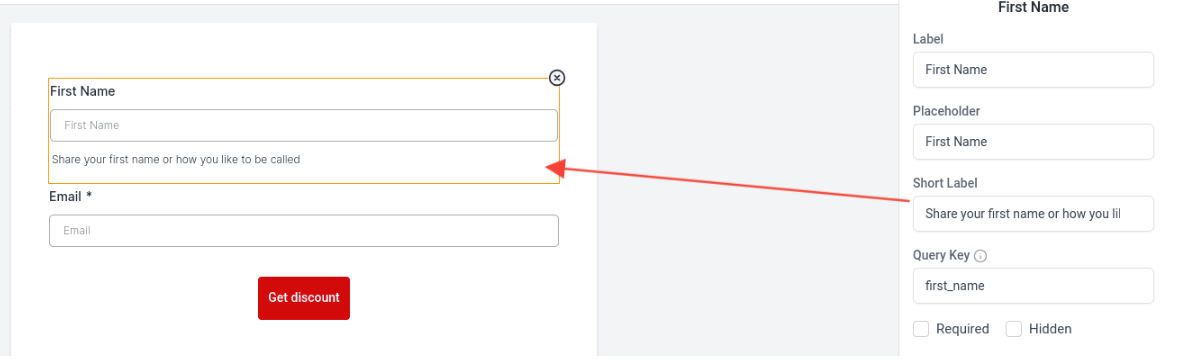
Note: You can also add a short label to each element you add. This allows you to assign a brief and focused title or heading to each element in your form. It serves as a quick overview of the content or input expected from respondents.
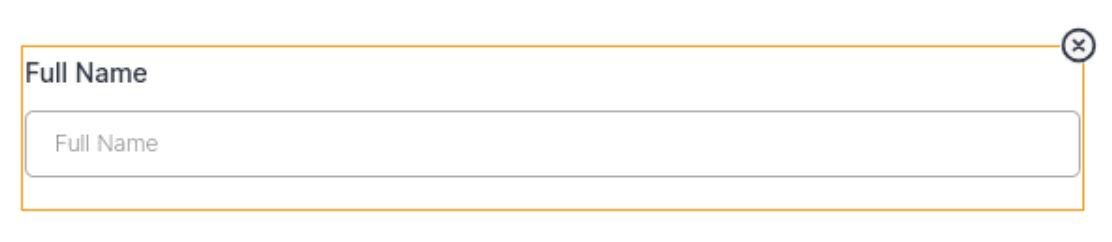
- If you don’t need this element anymore, click on the element, and on the X to delete it.
- You also have the option to add your custom fields. Next to the Elements (Quick Add tab), you will see the Custom Fields.
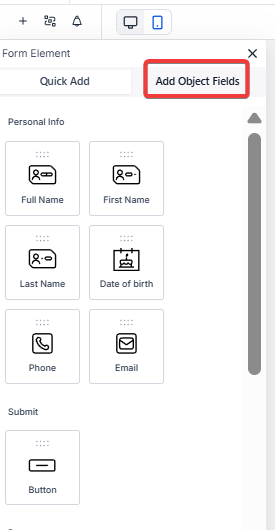
- This is the list of elements you can add from the Quick Add section:
- Full Name
- First Name
- Last Name
- Date of Birth
- Phone
- Button
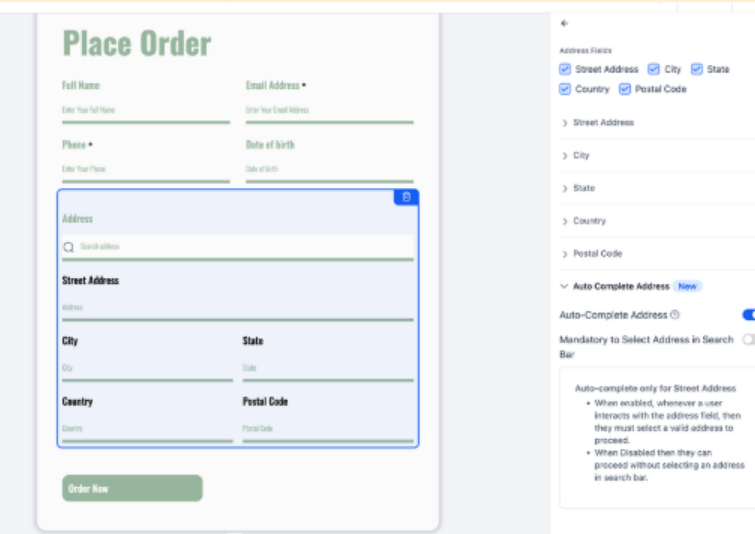
- Address
- City
- State
- Country
- Postal Code
- Website
- Organization
- Text
- HTML
- Image
Note: The Image element can resize the image in the builder itself. You can also align the image and add text to images for SEO purposes.

- Captcha
- Source
- Terms & Conditions
Note: Cloning allows you to duplicate elements or slides while retaining all settings, styles, and validations, saving time and ensuring consistency.
Address Auto-Complete makes it easier for users to enter accurate addresses by showing real-time suggestions and auto-filling fields like street, city, state, postal code, and country. This speeds up submissions, reduces errors, and improves data consistency. Just add the Address field in your form and toggle on Auto-Complete
¶ Step 3: Add Conditional Logic (Optional)
- On the left side, you will see the logic icon, next to the “+” to add elements
- Click on it to start the conditional logic
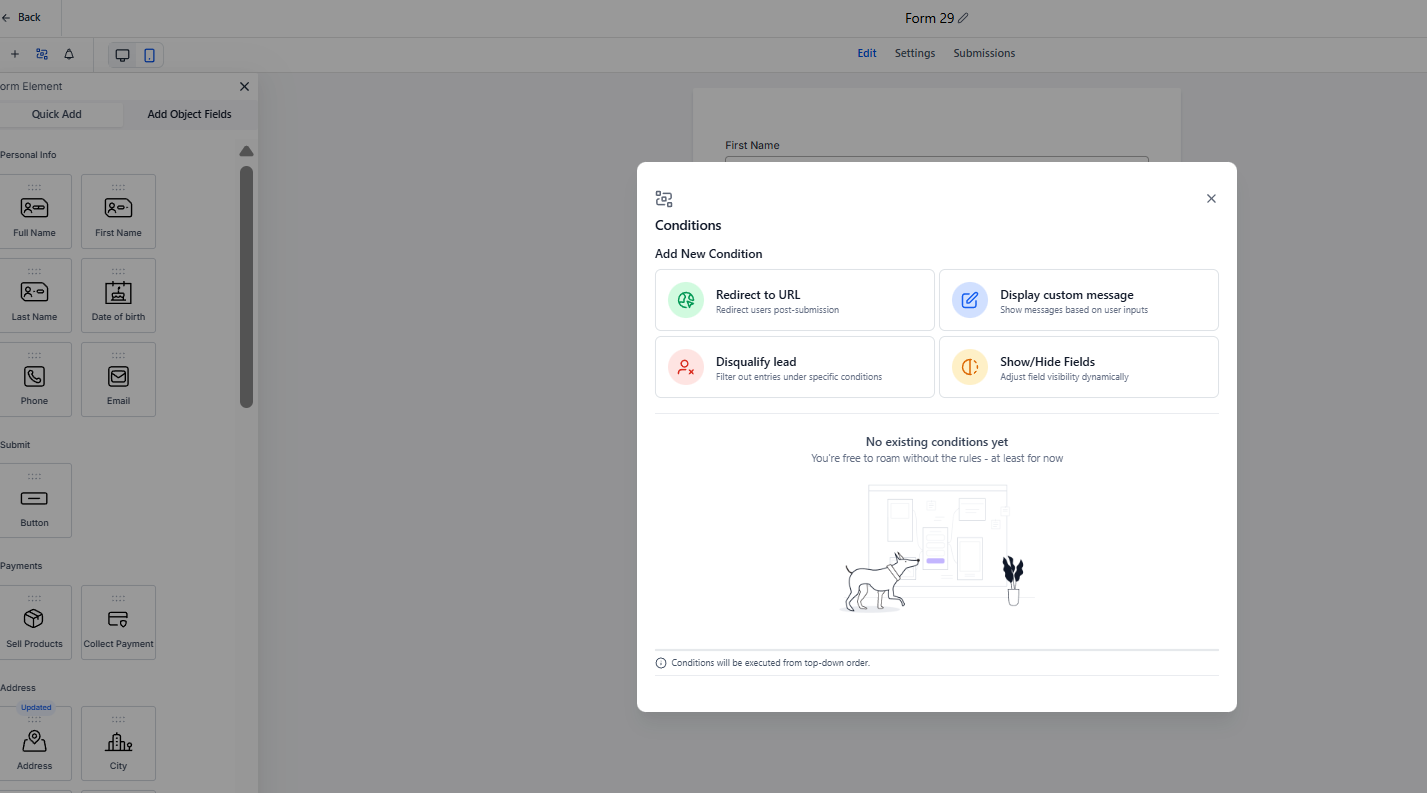
- Redirect to URL:
Users are redirected to a designated URL if a specific input is entered into a field or a particular option is selected.
- Display Custom Message:
Conditional messages are displayed based on user input or selected options. This feature allows tailored communication with users based on their actions within the form.
- Disqualify Lead:
Leads can be disqualified if certain conditions are met, such as entering specific information. After disqualification, users can be presented with a custom message or redirected to a specified URL.
Note: Disqualified leads are not counted as submissions.
- Show/Hide Fields:
Fields can be dynamically shown or hidden based on user input or selected options. This feature enables a more streamlined and personalized form experience for users.
¶ Step 4: Edit your Form by Styling it
- Go to the right side and click on ‘Styles & Options.
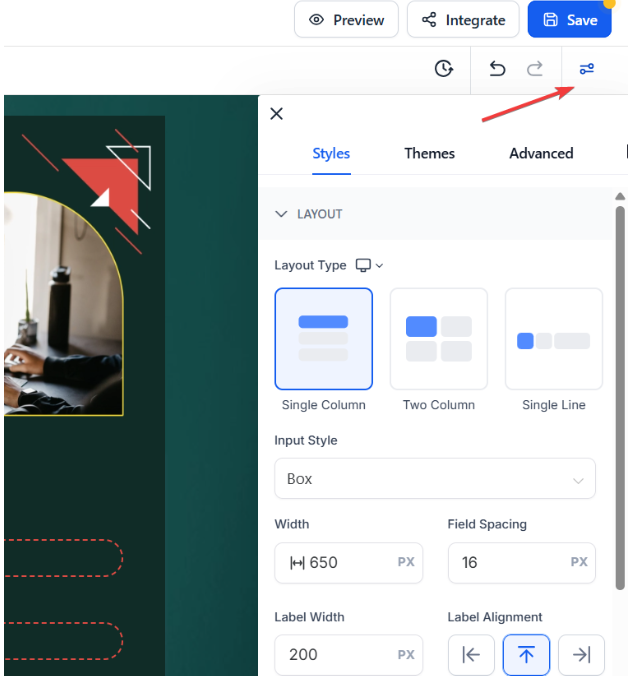
- Understyles , you can edit:
- The layout
- The form style (background, padding, borders, shadow, etc)
- The custom field style
- The label
- Placeholder
- Add Custom CSS
- The background image, intended to cover the entire page, provides a visually appealing backdrop for the form.
- The header image, is designed to cover the entire width of the form and remains positioned at the top of the form. This allows you to display captivating images at the top of the form, creating an impactful and visually engaging experience.
- Toggle the agency branding
- Under**“Themes”** you will be able to choose from a wide array of professionally crafted themes that suit various styles and purposes.
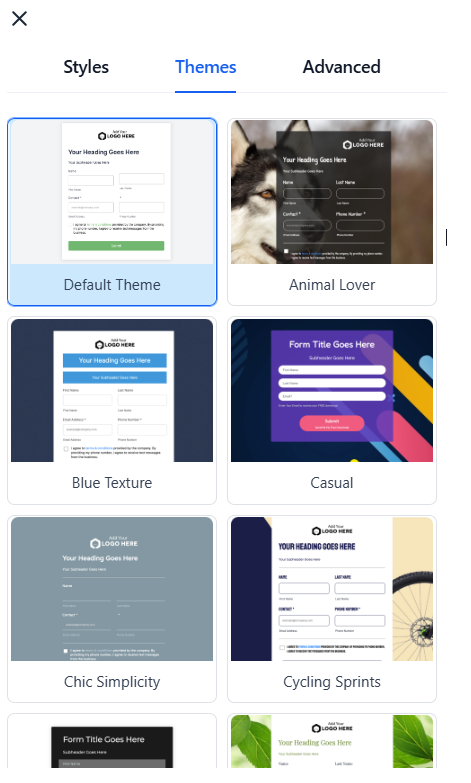
Note: All the themes come already with a background, field style, font, size, button design, etc. Below is an example of what the Casual theme looks like.
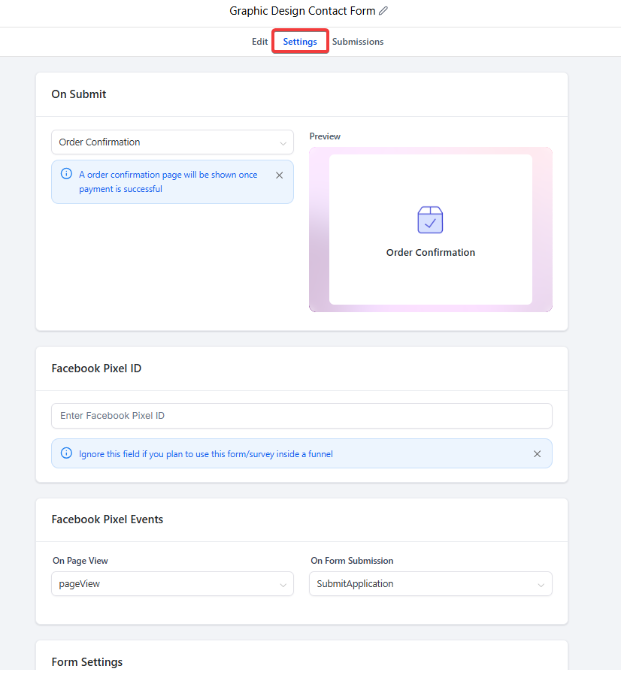
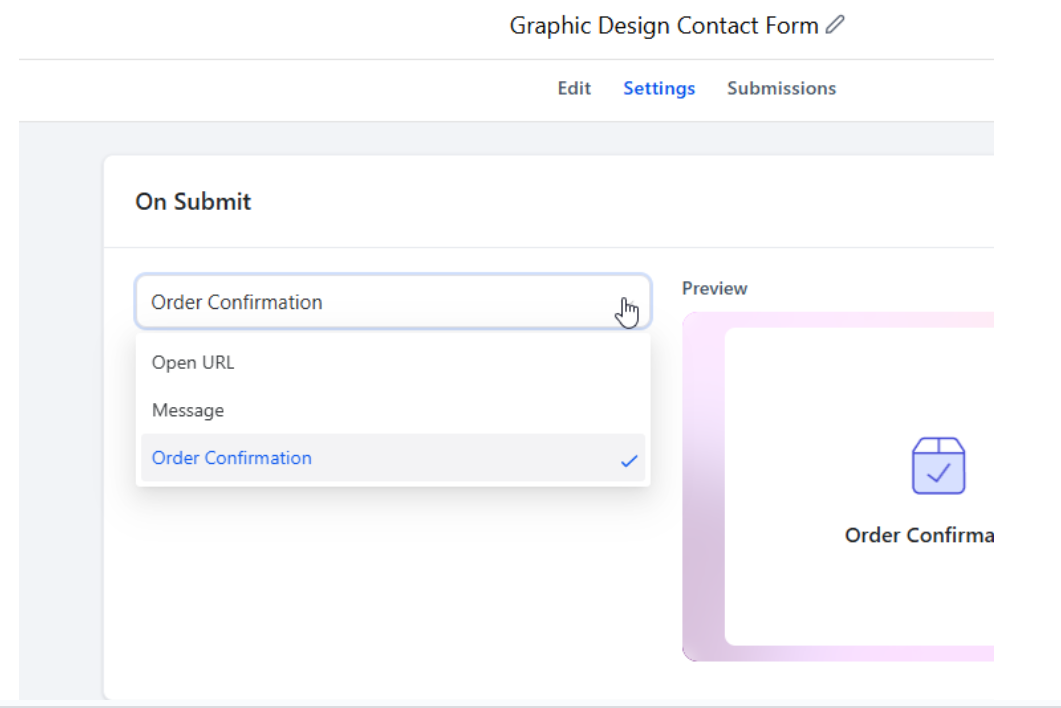
- Under “Settings,” you can choose the form name, determine what happens upon submission (redirect to a specific URL, show a thank you message or show an order confirmation if a product was sold via this form), add a Facebook Pixel ID, and enable timezone. You can also toggle on or off the Sticky Contact feature. Additionally, the side-tray controls have been moved to a settings icon for smoother inline editing on smaller screens. This allows you to open and close the tray without losing your selection.
For more information on selling products via forms, please refer to our Adding and Using Products in Forms article.
Note: Activating the timezone option will capture the time zone information of the individual submitting the form
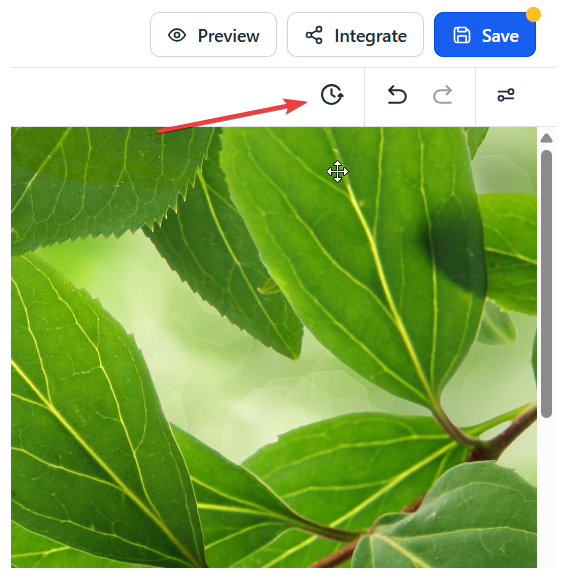
¶ Step 5: Version History
In the version history, you can access previous versions of a form. For instance, if you’ve made changes and saved them, but now want to retrieve an earlier version, you can do so from the version history. This feature displays the date and time of each iteration, allowing you to track and restore earlier versions as needed.
¶ Step 6: Integrate the Form
Generate links and embed codes. Connect forms to calendars and integrate them into your funnels and websites. Leads and contacts can fill out forms with ease, while you manage submissions in the system.
- Once you create a form and save any changes, you can click “Integrate Form” to access a link or embed code.
- We have multiple options for integration.
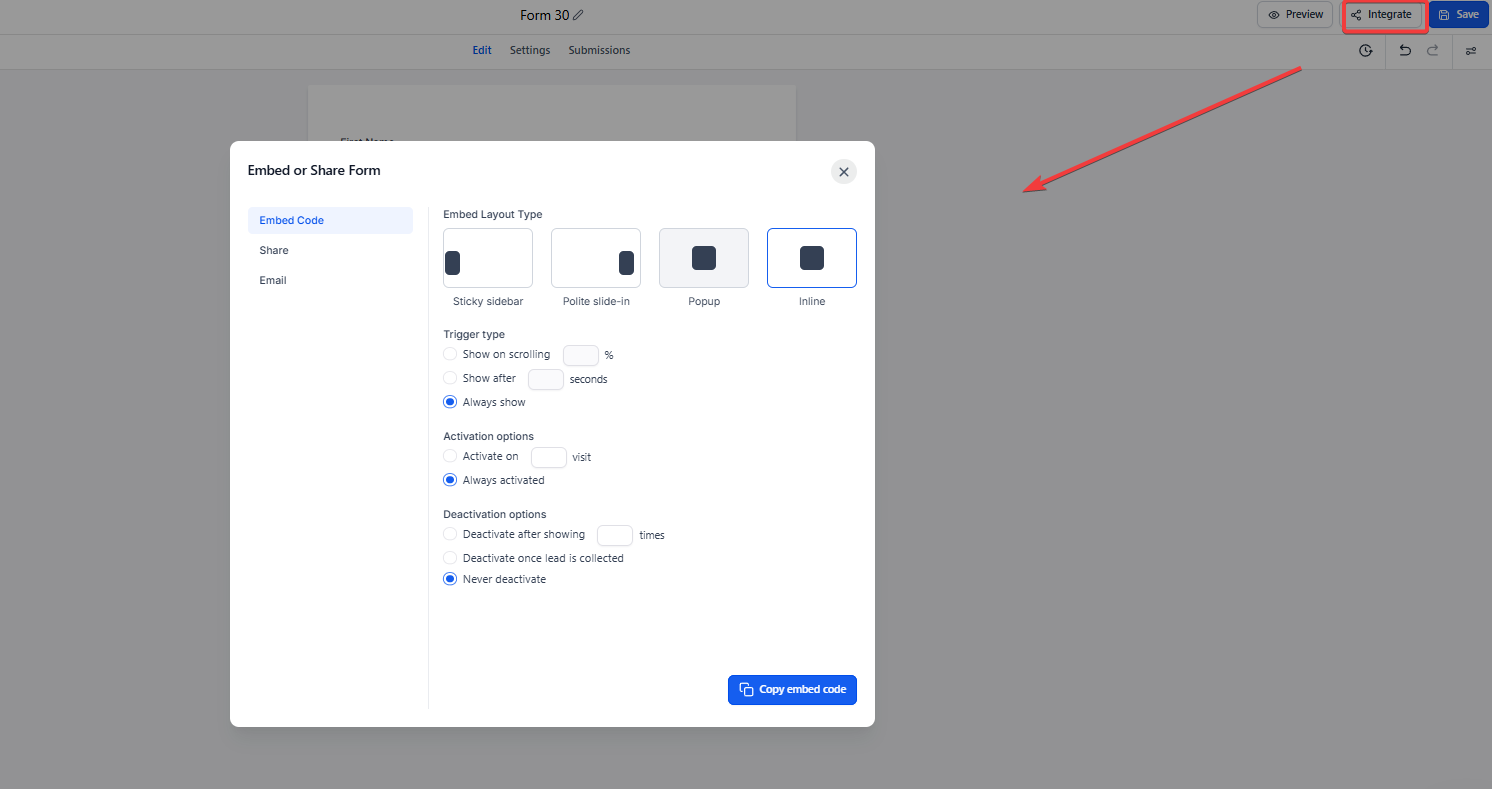
- Forms can also be connected to a calendar (check out Calendar Settings to learn more about this.)
- Forms can also be used in Funnels or Websites using the Form Element
- Once a form is integrated into the system in one of these ways, leads/contacts will be able to fill it out accordingly, and you can view the submissions in your system.
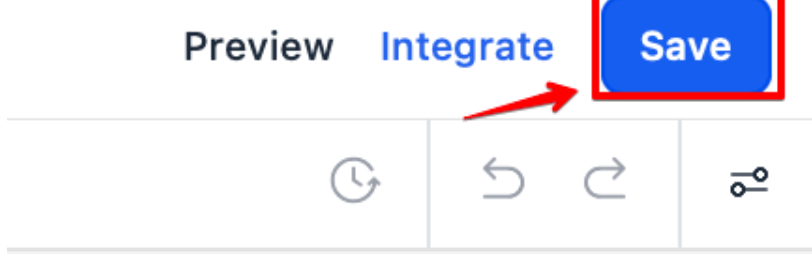
¶ Step 7: Save your Form
Although we recommend that you save your form from time to time while you are editing, don’t forget to save it one last time when all the edits are done.
¶ Noteworthy Features
- The Inline Editing feature allows users to edit text elements directly within the builder preview. You can click, type, and instantly update text elements like labels, placeholders, options, and buttons. Click on any text element in the builder, edit it directly, and see your changes reflected instantly.
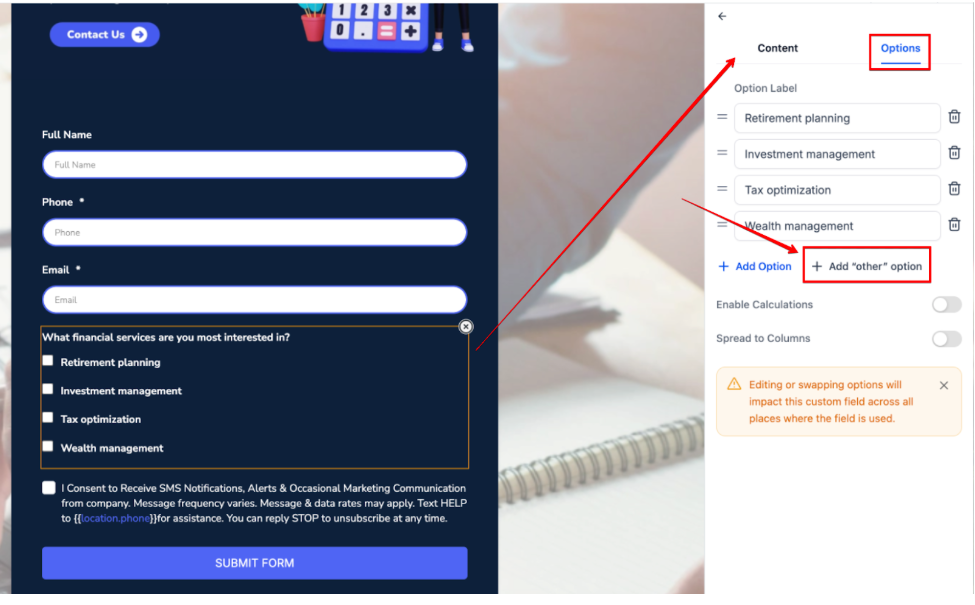
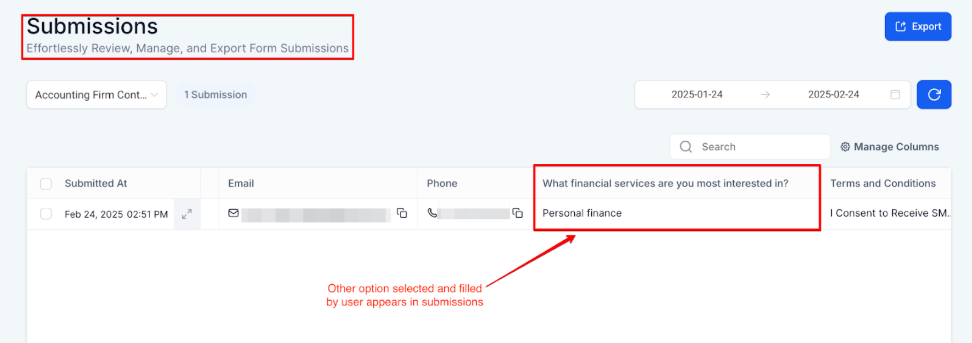
- The "Other " option in forms allows respondents to provide custom answers when standard choices don’t apply. You can add the “Other” option to your multiple-choice fields in the form builder. This feature supports both checkboxes and radio buttons, with custom responses displayed seamlessly alongside standard answers in reports.
** Payments Element and Order Confirmation**
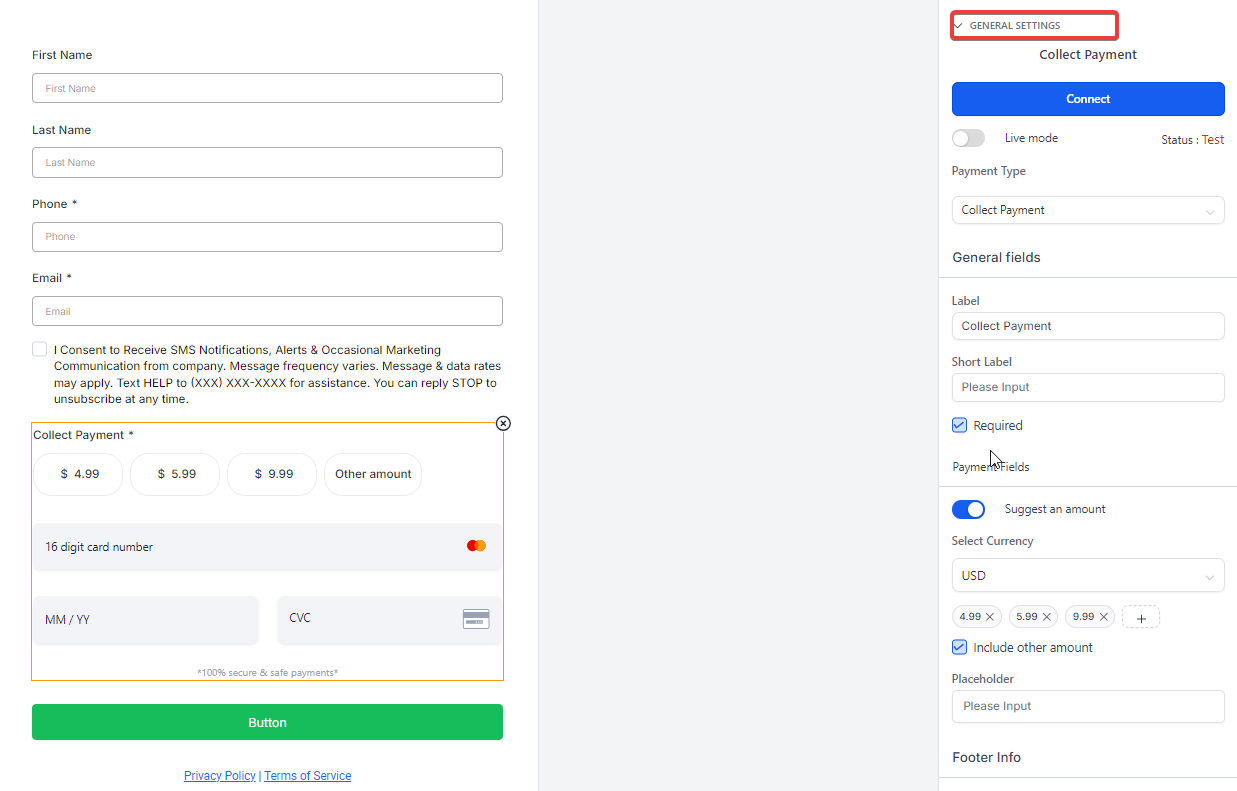
1. Add the Payments Element: Drag the Payments element into your form.
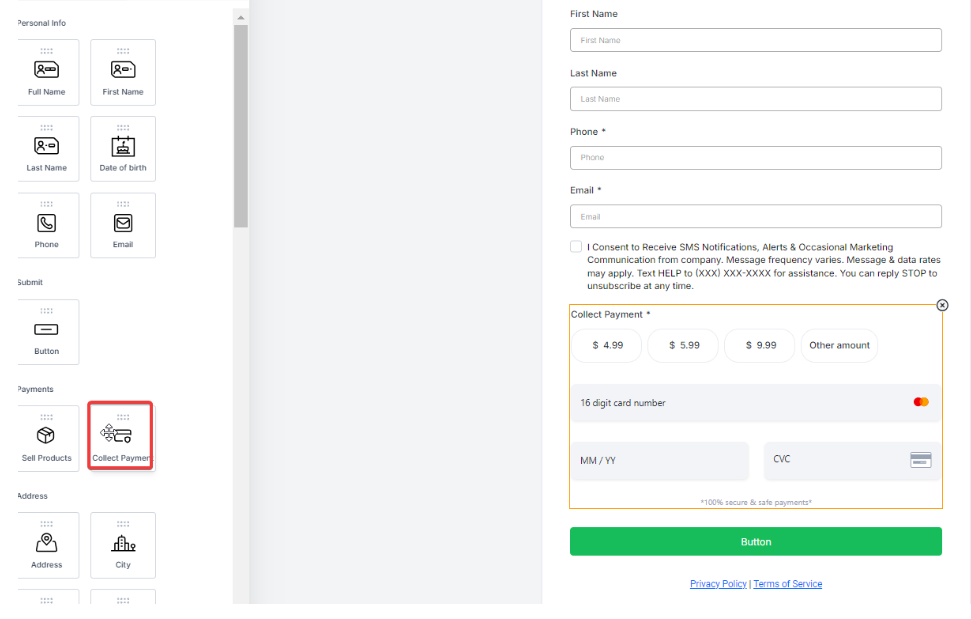
2. Configure Payment Settings: Click on the Payments element to set up product options, prices, and payment details.
3. Set Up Order Confirmation: In the form settings, enable “Show Order Confirmation” under submission actions to display an automatic confirmation page after payment.
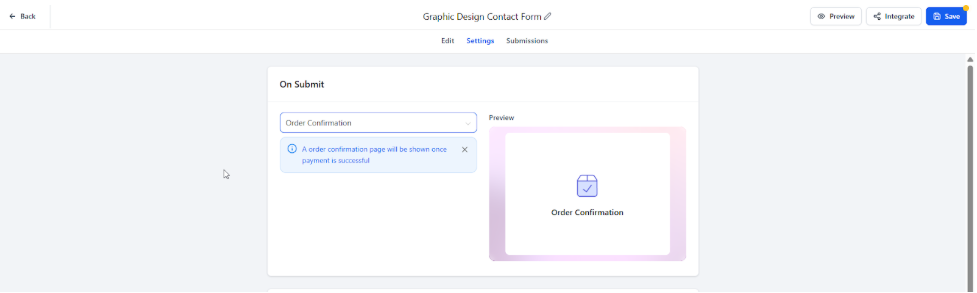
4. Customize Confirmation Page: The confirmation page will match your form’s theme for a consistent user experience. Currently, customization options for the order confirmation page are limited.
Zero Vertical Padding Support for Forms
Forms support true zero padding on the top and bottom, allowing complete control over vertical spacing. This helps create cleaner, more precise designs without unnecessary whitespace—ideal for achieving pixel-perfect alignment and modern layouts.
How to apply zero padding:
1- Open the Forms.
2- Go to Styles → Layout → Padding.
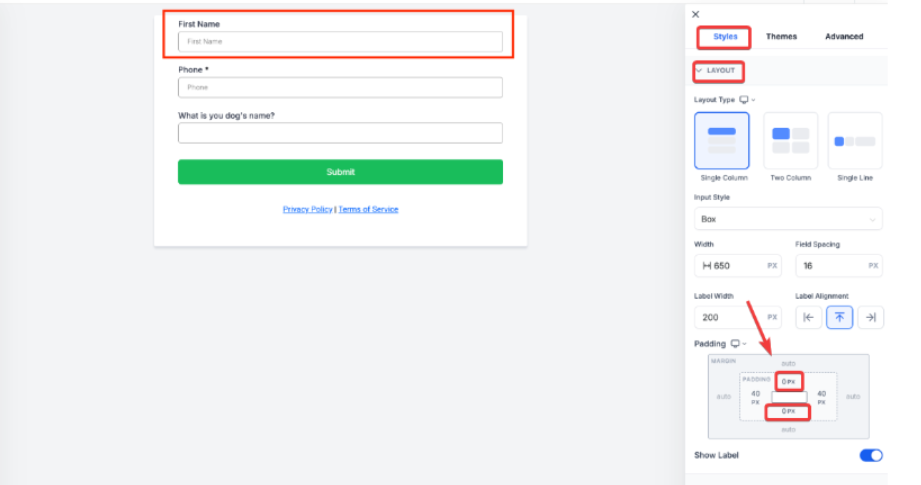
3- Preview and publish to apply the changes.
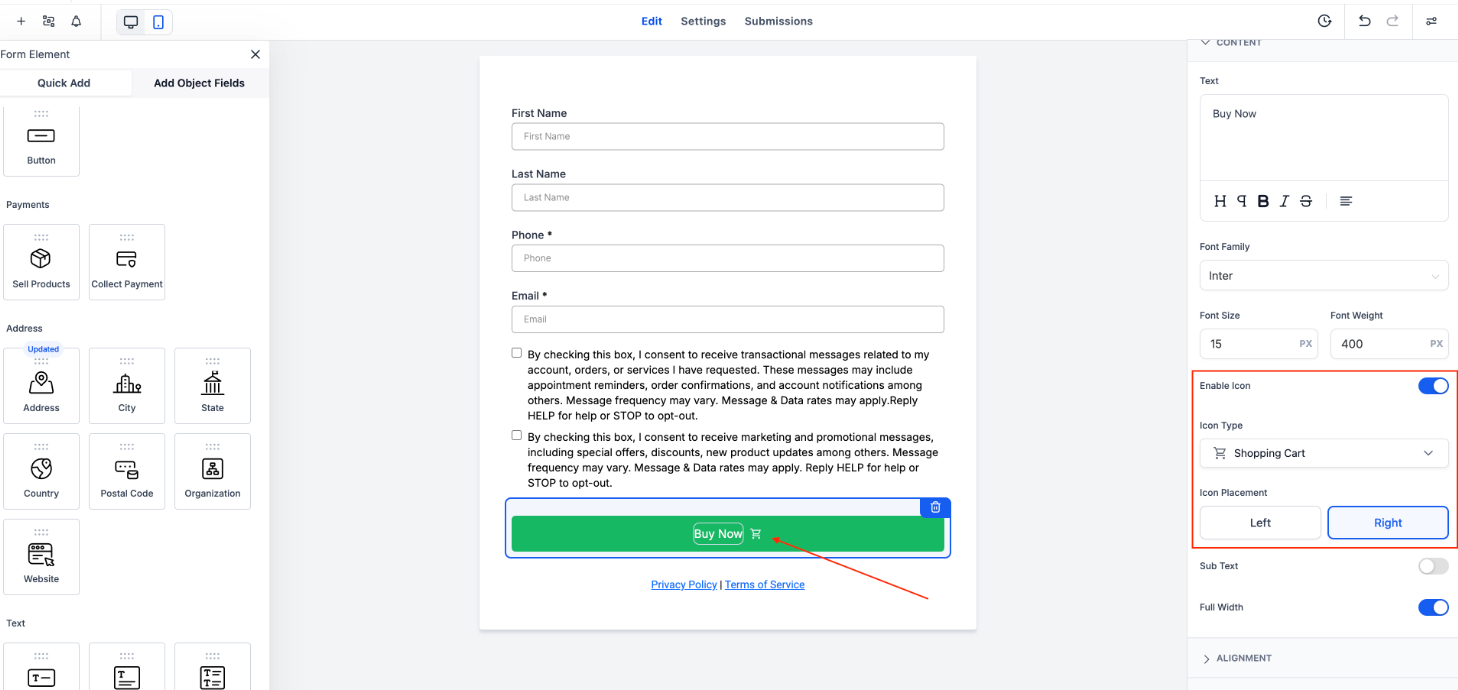
Button Icons for Form Button Elements
This enables icon support for form button elements in LeadMagicX, allowing users to enhance buttons using a searchable icon picker powered by a broad library of Material Symbols.To use it, add a button in the form builder, toggle Show Icon , search and select the desired symbol in the icon panel, and choose its placement left or right of the label; changes will render instantly in the live preview.
¶ Additional Information
Here are some important features that are available in the form editor:
Inline Text Editing:**
**
- You can edit text directly in the form builder, including formatting options like bold , font size , and color. Simply click on a text block or heading, and make adjustments using the built-in editor for quicker formatting.
Device-Specific Styling:**
**
- Desktop and mobile views can now have separate styles. You can adjust background colors , padding , font sizes , and more for each device. To use this, toggle between Desktop and Mobile views in the editor, and apply changes to each device individually.
Mobile-Specific Text Adjustments:**
**
- Customize text for mobile users by shortening headlines or using alternative placeholder text for better clarity. This is especially useful for improving the layout on smaller screens.
Live Previews:**
**
- All design updates are shown in real-time as you make changes. This live preview lets you see how your form will look on both desktop and mobile devices before making it live.
Customizable Submit Messages:**
**
- You can create personalized “On Submit” messages using rich text formatting. Additionally, adjust the message layout for both Desktop and Mobile views. Use the Message Styling section to format your submit message and toggle between device views for a polished result.
Image Layout Controls
- This has four new alignment orientations (Left/Right, Center, and Left/Right Fixed) along with granular styling tools like focal point selection, custom corner radii, and image-to-field spacing for a more polished, professional design.
These features are available directly in the form editor. Simply navigate through the respective sections (like Text Editing , Styles & Options, and Submit Message Editor) to access and use these tools.
FAQs
Question: How do I add a Payments element to my form?**
**Answer: To add a Payments element to your form, navigate to the form builder, click on the “+” sign to see all available elements, and locate the Payments element. Click on it, drag it, and drop it into the desired position on your form. This allows you to set up payments directly through the form.
Question: What happens when a payment is made through the form?**
**Answer: When a payment is made through the form using the Payments element, an order confirmation page will automatically appear upon successful submission. This page provides a clear and concise confirmation message to the user, matching the theme of the form for a seamless experience.
Question: Can I customize the order confirmation page after a payment?**
**Answer: Currently, the customization options for the order confirmation page are limited. The page will automatically match the form’s theme, but more customization options, such as layout and content adjustments, are planned for future updates.
Question: What actions can I set for form submission besides order confirmation?**
**Answer: In the Form “Settings” on the top center, you can choose what happens after a form is submitted. Options include redirecting to a specific URL, displaying a custom thank you message or showing an order confirmation if a product was sold via the form. You can also add a Facebook Pixel ID and enable timezone tracking.
Question: How can I use conditional logic in my forms?**
**Answer: To use conditional logic, click on the logic icon located next to the “+” sign in the form builder. You can set up actions such as redirecting users to a specific URL, displaying custom messages based on user input, disqualifying leads based on certain criteria, or dynamically showing and hiding fields to create a more personalized form experience.
Question: Does this apply to all templates and layouts?**
**Answer: Yes, true zero padding is supported across all layout variations for forms, surveys, and quizzes.
Question: Can I access previous versions of a form?**
**Answer: Yes. The Version History feature lets you view, track, and restore earlier versions, complete with timestamps for each change.
Question: Can I receive a notification every time someone submits a form?
Answer: While the Form Builder handles the collection of data, notifications are handled via Automations. You should create a simple workflow with the trigger “Form Submitted” and an action for “Internal Notification” to alert your team via email, SMS, or app notification.