¶ How to Connect SendGrid as your SMTP Service
How to Connect SendGrid as your SMTP Service
If you are using SendGrid for emails, you can connect your account to LeadMagicX to integrate it and send emails directly through LeadMagicX.
¶ Follow these steps to connect SendGrid:
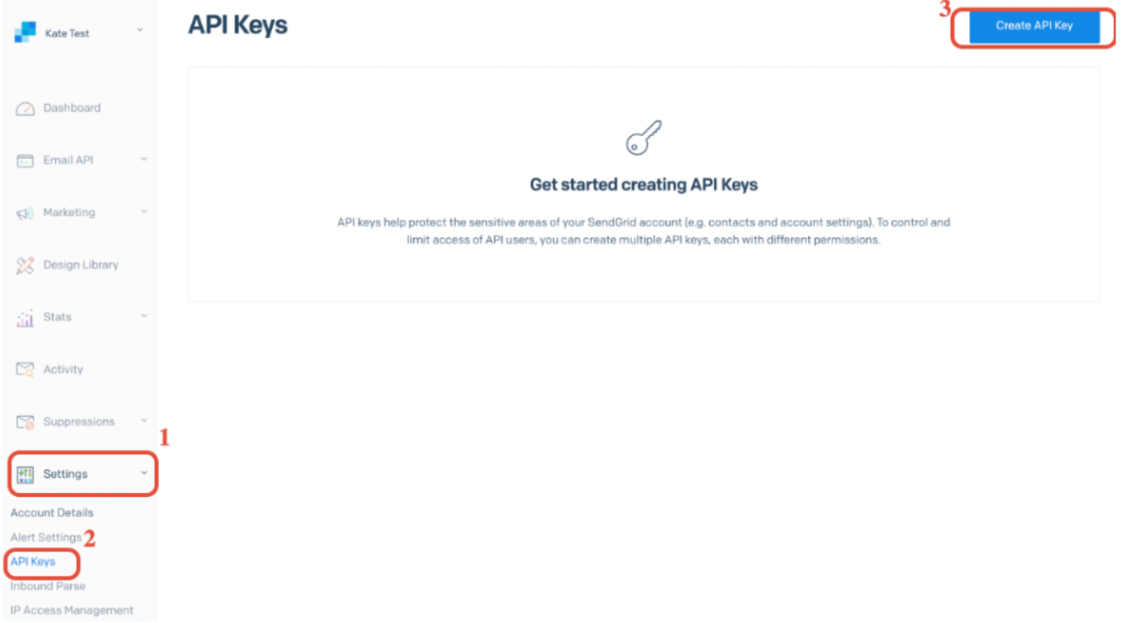
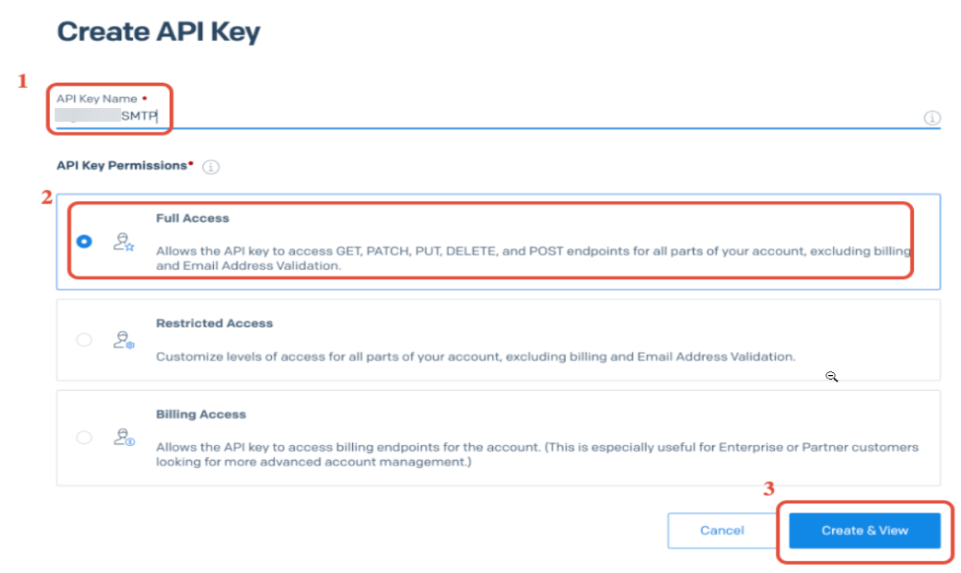
¶ Step 1: Create an API Key in SendGrid
- In your SendGrid account, create an API key with ‘Full Access’ under your SendGrid account settings > API Keys.
- Copy the highlighted API Key Created, as you will need it in Step 2.
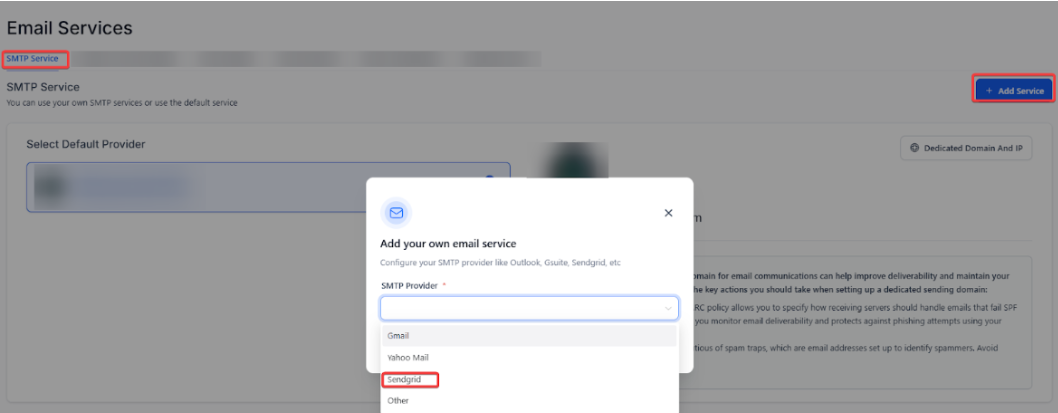
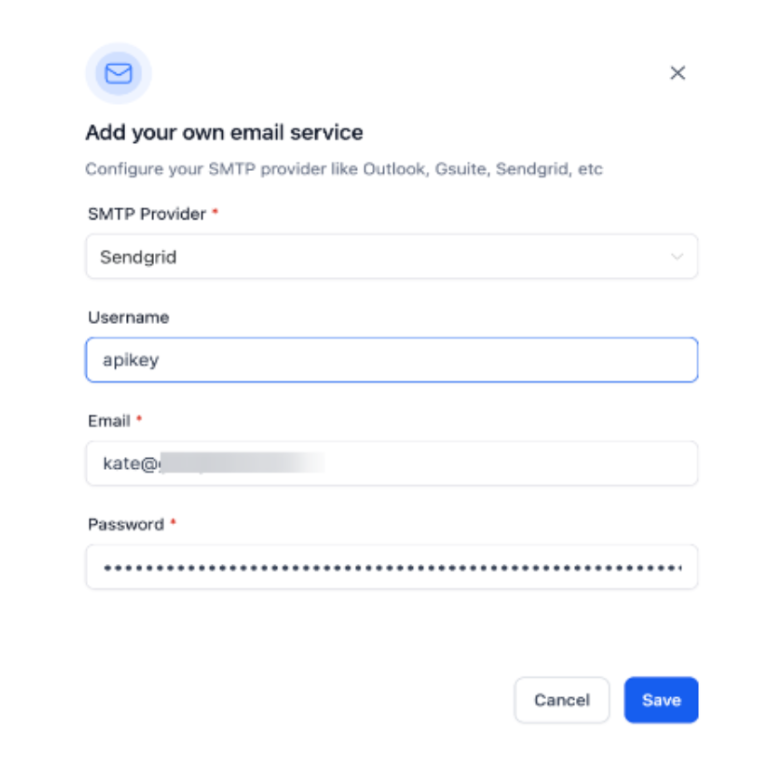
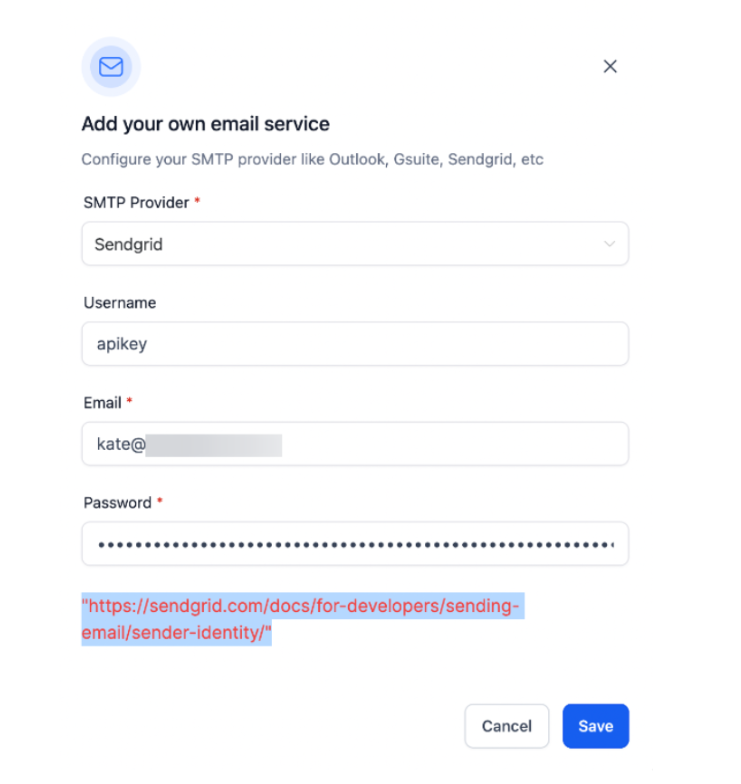
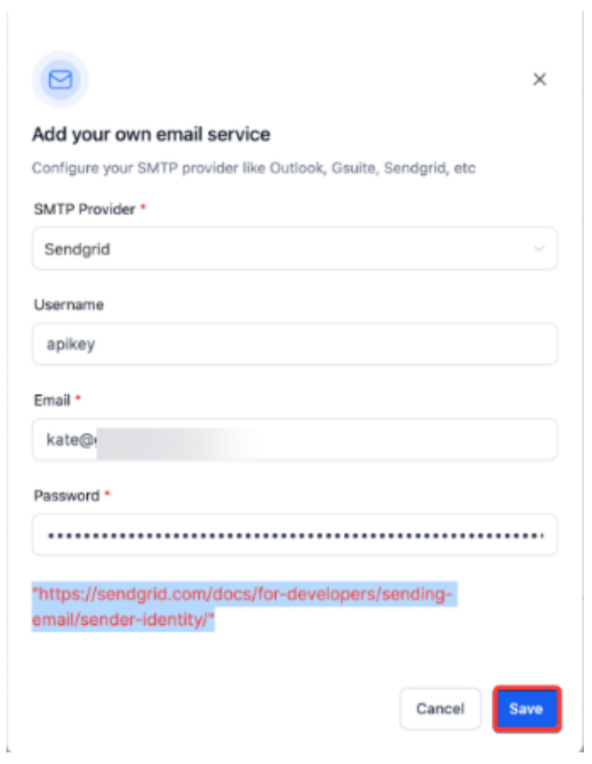
¶ Step 2: Connect your API Key to LeadMagicX to Integrate
- Back in LeadMagicX, navigate to Settings > Email Services
- Click ‘Add Service’.
- In the popup, select SendGrid.
- Set your username as apikey
- Set your email as your login email for SendGrid
- For password paste the API you generated from your SendGrid account (in Step 1).
You can now use SendGrid to send emails in LeadMagicX.
¶ In Case of Error:
If you encounter errors while integrating your email services with your SendGrid account, following specific steps to resolve the issue is essential.
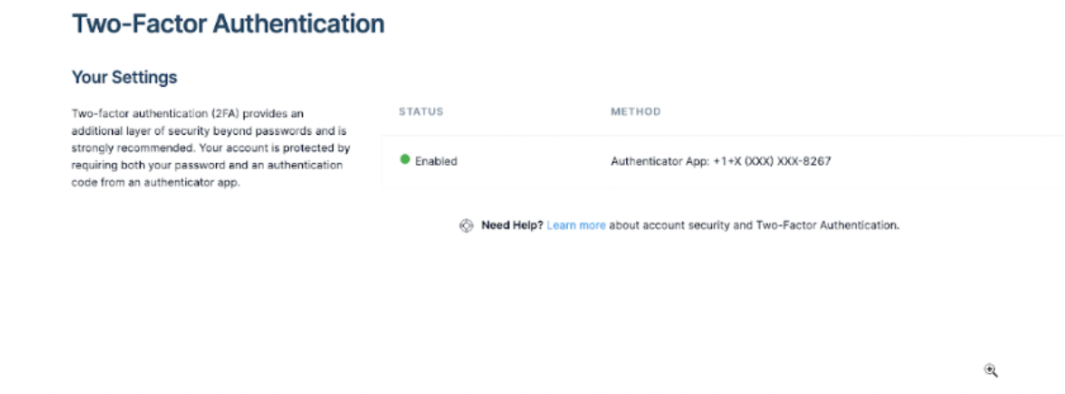
1. Verify Two-Factor Authentication (2FA)
Ensure that two-factor authentication is set up for your SendGrid account. This adds an extra layer of security and is often a requirement for certain integrations.
2. Verify Your SendGrid Login Email
Go to your SendGrid account settings and verify that your login email address is registered as a verified sender.
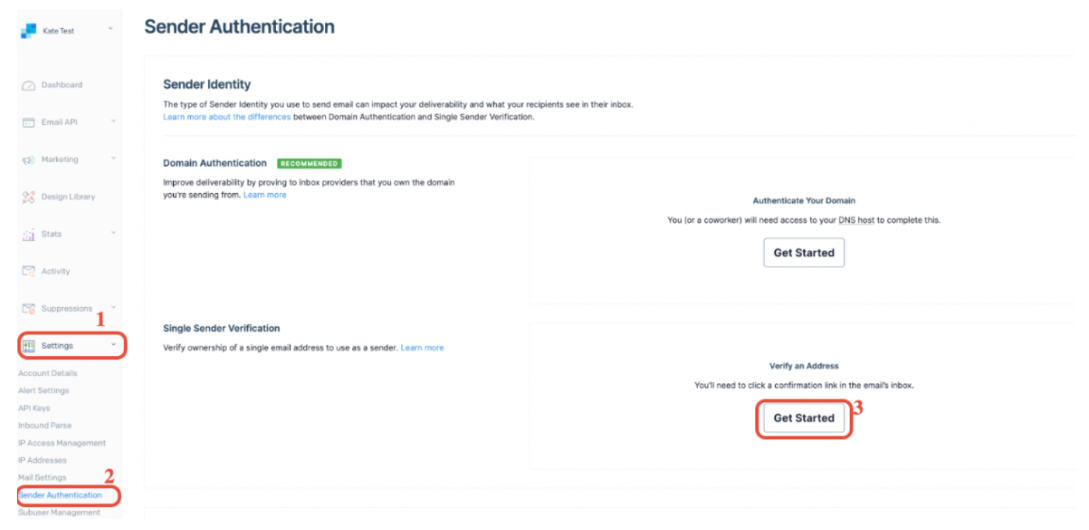
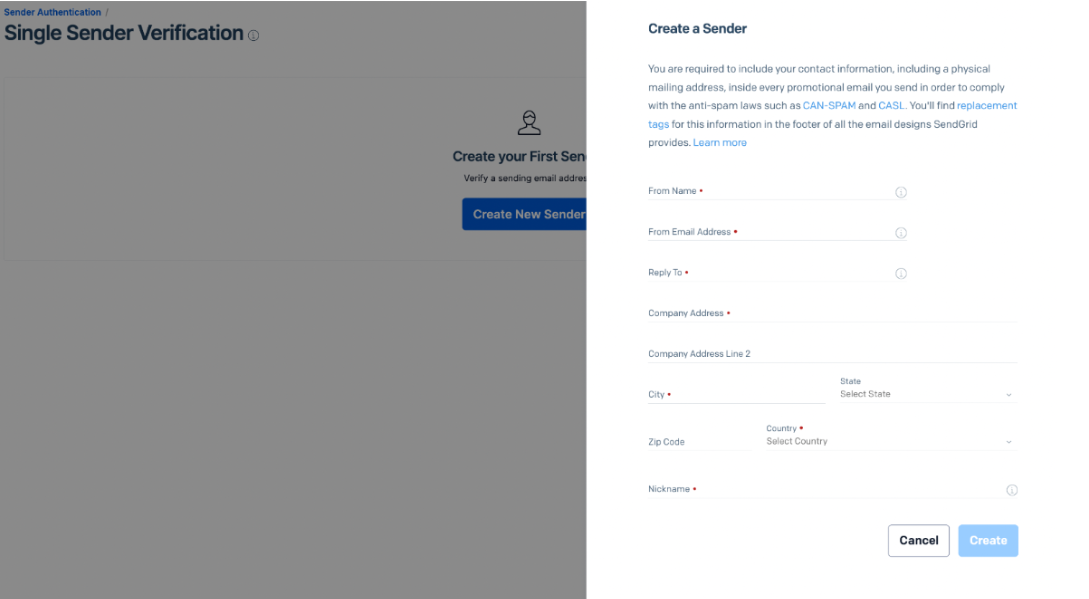
- Create and Verify a Sender Identity
3. Retry Integration
Once the sender identity is verified, go back to your integration settings and click ‘Save’ again to reattempt the connection. This should resolve any initial errors related to unverified sender identities.
¶ Check for Specific Error Messages
If you encounter an error when sending a test email, click the warning icon in the conversation to view detailed error information. For example, an error message stating “550 The from address does not match a verified Sender Identity” indicates that your sender email must be verified.You can do this by either navigating to Contacts and selecting the contact with which you experienced this error or by navigating to Conversations.
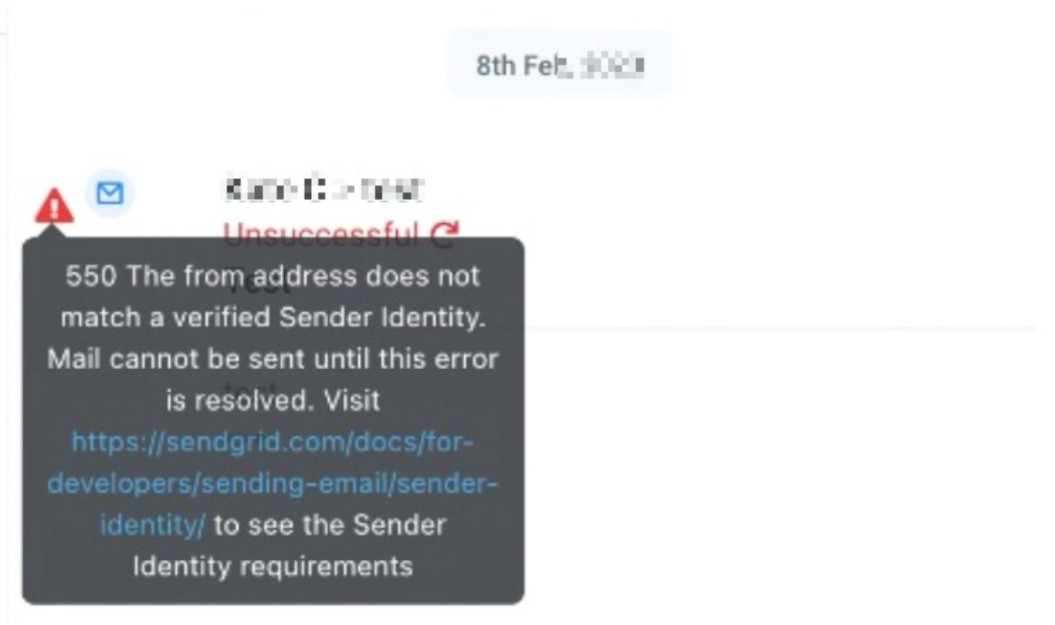
550 The from address does not match a verified Sender Identity. Mail cannot be sent until this error is resolved. Visit https://sendgrid.com/docs/for-developers/sending-email/sender-identity/ to see the Sender Identity requirements
When you make sure the sender email matches with the SMTP integrated email, or make sure the sender email is verified with Sendgrid:
https://docs.sendgrid.com/ui/sending-email/senders
¶ Pro Tips
- Keep Sender Emails Consistent: Ensure that the sender email used in your communications matches the verified sender identity in SendGrid.
- Regularly Update API Keys: Periodically review and update your API keys to maintain security and functionality.
- Monitor Integration Status: Check your integration settings regularly to ensure they remain correctly configured and operational.
- Consult Error Logs: Use detailed error messages to diagnose and resolve issues quickly.
FAQ
Question: What is an API key and why do I need it?**
**Answer: An API key is a unique code used to authenticate and connect your SendGrid account with LeadMagicX. It provides secure access for sending emails.
Question: How do I create an API key in SendGrid?**
**Answer: Log in to your SendGrid account, navigate to Account Settings > API Keys , and create a new key with ‘Full Access’ permissions.
Question: What should I do if my sender email is not verified?**
**Answer: Ensure your sender email is registered and verified in SendGrid. Go to the sender identity settings in your SendGrid account to verify the email address.
Question: Why is two-factor authentication (2FA) important?**
**Answer: 2FA enhances security by requiring an additional verification step beyond just your password, which helps protect your SendGrid account from unauthorized access.
Question: How can I resolve the “550 The from address does not match a verified Sender Identity” error?**
**Answer: Verify that the sender email address used in your email matches a verified sender identity in SendGrid. Update the sender details or verify the email address as needed.
Question: Can I create a new sender identity during setup?
Answer: Yes. If your required sender email is not listed, you can create and verify a new sender identity directly within the email service configuration area.
Question: Should I use my SendGrid account password in the password field?**
**Answer: No. For the integration to work, you must paste the API Key you generated in Step 1 into the password field. Using your regular account password will result in an authentication error.
Question: My API key says “Access Denied.” What permissions did I miss?
Answer: When creating your API key in SendGrid, you must select “Full Access”. If you chose “Restricted Access” and didn’t specifically enable “Mail Send” and “Template” permissions, the integration will be unable to transmit your emails.
Question: Where can I find the detailed reason why a specific test email failed to send?
Answer: You can find this in the Conversations tab or the specific contact record. Click the warning icon next to the failed message to view the specific SMTP error code and description.